



Payroll Summer 2026 Release Notes
Article Links
Timeline
When will this be released?
UAT: July 2nd, 2026 PT 5:00PM
Production: July 30th, 2026 PT 5:00PM
Is there downtime for this release?
No.
Related Release Note Links
FLSA OBBBA Enhancements
The One Big Beautiful Bill Act (OBBBA) introduces a temporary federal income tax deduction for a portion of overtime wages earned by eligible workers. This guide walks through the process to enable OBBBA overtime calculations within your payroll system. It also covers how to review and validate results after processing.
The OBBBA functionality is designed to work alongside your existing FLSA (Fair Labor Standards Act) overtime framework. It calculates the overtime premium separately and stores it using a memo earnings code for W-2 reporting purposes. This premium amount is not added to gross pay.
Before You Begin
Confirm that your system has received the Summer 2026 update and that the new OBBBA components are available in your environment. Finally, confirm with your tax or legal team which worker populations are eligible for the OBBBA deduction.
Reviewing Results
After running a payroll cycle with OBBBA enabled, there are two primary places to verify that the calculations are processed correctly.
- FLSA Audit Note. The system generates an FLSA audit note for each pay period. This note provides a detailed breakdown of all FLSA calculations performed, including the OBBBA-specific premium computation. Review this note to confirm that the overtime hours, rates, and premium amounts are calculated as expected. If discrepancies appear, cross-reference the audit note against your FLSA element configuration and the employee's time records.
- Print Pay Summary. When you pull up the print pay summary for a processed payroll, you will see your standard FLSA calculation details displayed as usual. At the bottom of the summary, look for earnings code 9899. This line represents the OBBBA overtime premium. Because 9899 is a memo code, this amount appears for informational and W-2 reporting purposes only and is not included in the employee's gross pay total.
Overtime Calculation Alternative
This feature introduces a new FLSA calculation method, "FLSA Minus Leave", selectable on the Work Rules (IDWR) page. It addresses a specific compliance need where employers want leave hours (such as vacation, PTO, or sick time) to factor into the employee's average hourly rate but not inflate the excess overtime hours calculation.
Under the standard FLSA calculation, leave hours are included in Total Hours, which is used both to determine the average hourly rate and to calculate Excess Hours. This means that when an employee uses leave during an FLSA period, those non-worked hours push the total above the base threshold (e.g., 40 hours), triggering excess overtime even though the employee didn't actually work those additional hours.
For example, an employee who works 32 regular hours and takes 8 hours of PTO plus 1 hour of overtime would show 41 total hours, generating 1 excess hour under the standard method. But the employee only worked 33 hours, well below the 40-hour threshold. The employer may choose to pay overtime as a company policy or per a collective bargaining agreement, but under strict FLSA rules, no federally required overtime premium is actually owed.
This distinction matters significantly for OBBBA (Other Base, Bonus, and Benefit Amounts) reporting on W-2 Box 12 Code TT, where employers must report only the overtime that is genuinely required under Section 7 of the FLSA, not additional premium pay driven by company policies, state laws, or union contracts.
Wage Calculation (Rate Determination)
Leave hours remain included in Total Hours when calculating the average hourly rate. This ensures the rate calculation accurately reflects the employee's total compensation spread across all hours, both worked and leave, which is the correct approach for determining the FLSA regular rate of pay.
Excess Hours Calculation (Overtime Determination)
Leave hours are subtracted from Total Hours before determining excess hours at line K. This ensures that only actual hours worked above the base threshold (typically 40 hours for standard employees, or the applicable 7(k) exemption threshold for public safety) generate FLSA excess overtime. If the employee's actual working hours don't exceed the threshold, it will be zero and no FLSA premium is owed, even if total hours including leave exceed the threshold.
Benefits
- Compliance accuracy: Enables Payroll Administrators to distinguish between federally required FLSA overtime and additional premium pay driven by company policies, state laws, or collective bargaining agreements.
- Client flexibility: Employers who are generous with overtime (paying OT even when employees haven't hit 40 actual worked hours) can now correctly separate what they choose to pay from what they are federally required to pay.
Example Scenario
An employee has the following hours in a standard 7 day FLSA period (base threshold = 40 hours):
| Hours Type | Value |
|---|---|
| Regular Hours (A) | 32.00 |
| Overtime Hours (B) | 1.00 |
| Leave Hours, PTO (C) | 8.00 |
| Total Hours (E = A+B+C) | 41.00 |
Standard FLSA Method:
Excess Hours = 41.00 − 40.00 = 1.00 hour → FLSA premium is calculated on 1 excess hour
FLSA Minus Leave Method:
Excess Hours = (41.00 − 8.00) − 40.00 = 33.00 − 40.00 = 0.00 hours → No FLSA premium owed
The employer still pays the 1 hour of overtime per their company policy (via PC 7002), but the OBBBA calculation correctly reports zero federally required overtime (via PC 9899).
Affordable Care Act Reporting
The Affordable Care Act (ACA) Reporting feature is available from the Payroll Dashboard’s modernized UI and brings ACA report execution into one centralized experience. From this area, users can access the ACA reporting suite, including:
- Affordable Care Act (UBACA) for monthly ACA data generation
- Employer-Provided Health Insurance Offer & Coverage (RB1095C) for 1095-C output
- Transmittal of Employer-Provided Health Insurance Offer (RB1094C) for 1094-C output
The overall ACA process starts before forms are produced. Customers typically run UBACA monthly to build the employee-level data needed for end-of-year ACA compliance reporting. That monthly data later feeds the 1095-C and 1094-C reporting processes.
In practical terms, the ACA reporting feature helps employers determine whether offered health coverage was affordable for eligible employees and whether the required reporting data has been generated for compliance use. The process relies on plan setup, employee hours, wage-related rules, affordability logic, and enrollment data.
How does it help?
The benefit of moving ACA Reporting into the new Payroll Dashboard UI is primarily a better user experience and simpler access to all ACA reporting functions in one place.
- Centralized access: Users no longer need to move between disconnected areas to run ACA-related reporting tasks.
- Modernized workflow: The new experience aligns ACA with other reporting functions being moved into the Payroll Dashboard.
- Clear report selection: Users can choose the specific report they need, such as UBACA, RB1095C, or RB1094C, from a single reporting entry point.
- Structured parameters and filters: The new UI organizes report inputs into clear sections, improving usability and reducing confusion.
- Support for compliance preparation: Monthly data generation, audit review, and year-end form generation are part of one reporting flow.
Operationally, ACA reporting also helps customers reduce manual effort. UBACA produces data that can be reviewed in an Excel output for audit purposes, and if needed, users can troubleshoot employee-level issues using ACA Monthly Data by EE (IBACAE). For view-only access, organizations can use VBACAE.
This modernization is especially helpful because ACA reporting is not a single one-time task. It is an ongoing compliance process that depends on repeatable monthly execution, careful review, and year-end follow-through.
What you need to know
ACA reporting in NEOGOV generally follows this flow:
- Set up ACA values correctly on benefit plans.
- Run UBACA monthly to generate ACA data.
- Audit the results using the Excel output and, when needed, IBACAE.
- Run year-end forms such as RB1095C and RB1094C.
Correct plan configuration is essential. During ACA setup on benefit plans, administrators use the self-only minimum value coverage to define ACA-specific values. Important setup elements include:
- ACA Min. Value Self
- ACA Monthly EE Prem
- ACA Coverage-1B
The employee deduction rate used for ACA setup must be a monthly amount. If rates change for a new year, both the rate table and ACA monthly premium values need to be updated.
UBACA is the monthly report customers run to build the data used later on 1095/1094 forms. Historical guidance shows the report commonly includes these main inputs:
- Year (YYYY)
- Month (MM)
- Use Eligibility Date
- Exception Level
The report only captures specific employee statuses, including active, pending, leave, unpaid leave, retired, COBRA, and terminated employees up to the month of termination.
Do not wait until the end of the year to run all 12 months at once. Monthly processing is the recommended approach.
New UI report options
Based on current ACA reporting enhancement work, the new UI supports report selection from the Payroll Dashboard. Depending on the report chosen, users may see different parameter sets. The report types include:
- Affordable Care Act (UBACA)
- Employer-Provided Health Ins. Offer & Coverage (RB1095C)
- Transmittal of Employer-Provided Health Ins. Offer (RB1094C)
The updated configuration pages use two primary sections:
- Parameters
- Filters
For RB1095C, planned parameters include items such as Year, As of Date, Date/Time Marker, Final, Corrected, Interface Code, Hide SSN, Blank Out L16, Skip Part Time EE, Sort By, and Trial. Filters may include ACA Category, Employee, Department, Location, Unit, Group, Payroll, Employment Type, and Pay Type.
These filters are intended to narrow the employee population when needed, though the default behavior is to include all employees unless filters are added.
Auditing and Troubleshooting
After UBACA runs, the generated Excel output can be used for auditing. Some important fields in the audit output include:
- Full Time
- Hours
- Wage Rate
- Enrolled Plan
- Enrolled Coverage
- Offered Plan
- Offered Coverage
- Coverage Rate
- Affordability
- Line 14 / Line 16
If results are incorrect, users can review and update employee-level details in IBACAE. However, there is an important behavior to remember: if UBACA is run again, manual changes to Line 14 and Line 16 revert to the newly generated values.
Important Reporting Considerations
- ACA depends on payroll and benefits data quality. Missing or incorrect plan setup can affect affordability and offer coding.
- ACA reporting is sensitive to timing. There is a known requirement to prevent UBACA from processing while pay is in calc/paid stage so that unofficial or in-progress records do not affect results.
- Employee termination scenarios can matter. Recent enhancement work has focused on improving Line 14 and Line 16 behavior when benefit coverage extends through the termination month.
- Form-generation behavior varies by report type. For example, SFTP messaging should only apply to the 1094C report in cases where a file is actually generated.
Notes
ACA reporting is both a compliance feature and a data quality process. The new Payroll Dashboard experience improves usability, but successful results still depend on:
- Accurate ACA setup on benefit plans
- Consistent monthly UBACA execution
- Careful audit of employee-level results
- Awareness of how reruns affect manual edits
- Understanding which report type is needed for the task at hand
New Payroll Register
The current pay register is delivered as a static, unstructured document that does not function as a true payroll verification tool. It contains excessive and repetitive information, lacks critical context and calculated totals, and uses inconsistent naming conventions, making it difficult for payroll teams, finance, and auditors to confidently validate payroll. As a result, users rely heavily on manual workarounds and external spreadsheets, increasing cognitive load, review time, and risk during each payroll cycle.
What does this solve?
The current pay register is delivered as a static, unstructured document that does not function as a true payroll verification tool. It contains excessive and repetitive information, lacks critical context and calculated totals, and uses inconsistent naming conventions, making it difficult for payroll teams, finance, and auditors to confidently validate payroll. As a result, users rely heavily on manual workarounds and external spreadsheets, increasing cognitive load, review time, and risk during each payroll cycle.
How does it help?
Payroll teams can validate pay directly in the register without rebuilding reports in Excel. The register becomes audit-ready and compliant, reducing reliance on supplemental documentation. Manual spreadsheet work and duplicate report creation are significantly reduced. Critical payroll information (hours, rates, deductions, totals) is easier and faster to scan.
T&A Controls Charge Code 1 and 2
This feature introduces conditional visibility for the Charge Code 1 and Charge Code 2 fields throughout the Payroll product. Visibility is driven entirely by whether those cost center types have been configured in Time & Attendance. If an agency has not created any Charge Code 1 or Charge Code 2 records in T&A's Cost Centers page, the corresponding columns will remain hidden across all Payroll screens, import templates, and export files.
Previously, these columns could appear in Payroll regardless of T&A configuration, which led to unnecessary clutter for agencies that don't use charge codes, potential data entry mistakes from users filling in fields that had no backing configuration, and inconsistent import/export templates that included columns not relevant to every agency.
With this update, Payroll Administrators only see the charge code fields that are actually in use, import and export templates dynamically adjusted to match the agency's setup, and data consistency between T&A and Payroll is maintained automatically.
Setup: Configuring Charge Codes in T&A
Before any charge code columns appear in Payroll, an administrator must first create the corresponding cost center types in Time & Attendance. To do this:
- Navigate to Admin > Time > Cost Centers from the top menu.
- Select Add to create a new cost center record.
- In the Type dropdown, select either Charge Code 1 or Charge Code 2.
- Enter a meaningful Code and Description for the charge code.
You may optionally define a Start Date and End Date to control when the charge code is available for selection. - Click Save to finalize.
When one Charge Code 1 record exists in T&A, the Charge Code 1 column becomes visible in Payroll. The same applies independently to Charge Code 2. An agency may configure only Charge Code 1, only Charge Code 2, both, or neither. Each is evaluated separately.
Payroll Visibility
When a charge code type is active in T&A, the corresponding column appears in the Entry Details screen under Manage Pay, alongside the existing Cost Center column. It also appears in the Payline Results screen, where charge code values that flowed from T&A timesheet entries into payroll are displayed. Values entered on the T&A timesheet automatically carry over into the Payroll payline during payroll processing.
When a charge code type is not configured in T&A, the column is completely hidden from all of these screens. There is no manual toggle in Payroll, visibility is controlled entirely by the T&A configuration.
Import and Export
The Payroll Import and Export templates are dynamically generated based on the T&A configuration. If Charge Code 1 is configured in T&A, the import and export templates will include a CHARGE_CODE_1 column. If Charge Code 2 is configured, a CHARGE_CODE_2 column is included. If neither is configured, these columns do not appear in the templates at all.
This means agencies using charge codes will have a unique import template that differs from agencies that do not use them. It is important to download a fresh template after configuring charge codes in T&A to ensure your file includes the correct columns. Attempting to import a file with charge code columns when the corresponding type is not configured in T&A will result in errors.
Security and Permissions
Administrators can control access to Charge Code 1 and Charge Code 2 on a per-security-profile basis. To configure permissions:
- Navigate to CoreHR Dashboard > Admin > Security > Security Profiles and edit the desired security profile.
- Under the Field Controls tab, scroll to the Timesheet Entries section.
For Charge Code 1 and Charge Code 2, you can set one of four permission levels:
- Default allows users to select all codes they have permission for on the timesheet.
- View allows users to see the column but not make a selection. This is generally not recommended.
- Required forces users to make a selection before submitting or approving a timesheet, and a warning is displayed if the field is left empty.
- Hide removes the column entirely for users under this security profile.
- Under the Data Access tab, you can set restrictions on which specific charge codes a security profile can use.
- Click Add New to add a restriction row, then select Restricted From or Restricted To for a specific charge code. Click the check mark icon to save the entry, then click Save in the top right corner.
By default, all security profiles can use charge codes on timesheets if they exist in the site. Administrators should review and update permissions before go-live to ensure appropriate access controls are in place.
Quarterly SUI Reporting
This guide explains how to run a quarterly SUI report from the Payroll Dashboard using the new self-service reporting experience. It is intended for payroll administrators who need to generate quarterly state unemployment insurance files with less manual setup than the legacy RPYEU process.
What changed?
Quarterly SUI filing was added to the Payroll Dashboard so agencies can run their own state SUI reports directly from the dashboard. The new experience is designed to reuse existing reporting logic while hiding most of the legacy parameters that commonly confuse.
Key Idea
In the dashboard flow, users should only need to choose the Federal Registration Number, State, Year, and Applicable Period. Complex state-specific parameters are intended to be auto-filled behind the scenes.
Before You Begin
Make sure the following are true before you run a quarterly SUI report:
- You have access to the Payroll Dashboard and its reporting options.
- The agency has completed payroll processing for the reporting period.
- The appropriate state registrations and tax setup are in place for the agency.
- You know which state you are filing for.
- You know which quarter or filing period you need to report.
- If your organization has employees in multiple states, plan to run one state at a time.
Important: Quarterly SUI reports are state-specific. If your agency has employees in multiple states, do not expect a single run to cover all of them. Each state must be generated separately because formats and filing rules vary by state.
How to access the report
- Open the Payroll Dashboard.
- Go to the Reports area.
- Select the option for the state SUI reporting link.
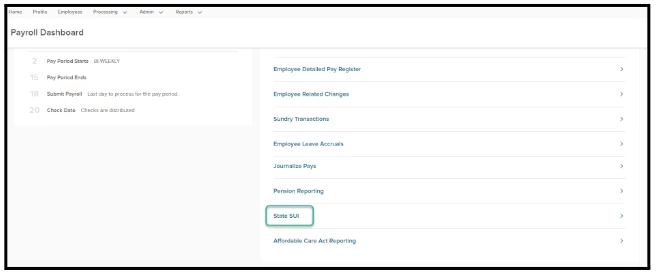
Run a quarterly SUI report
- Select the Federal Registration Number
- State you want to file.
- Select the Year and Applicable Period.
- Click Generate Report.
- Wait for the system to start the report process in the background.
- Download the generated output when it becomes available.
Expected result: The system generates the state-specific quarterly SUI output file using the correct mapped parameters for that state, without requiring the user to manually fill in all legacy RPYEU fields.
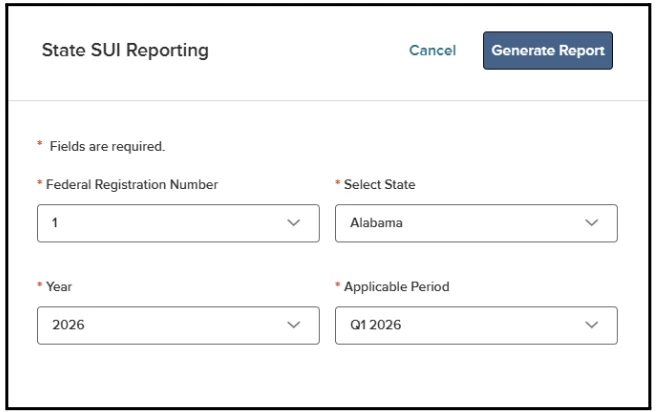
What the system handles automatically
The dashboard experience is designed to hide most of the old RPYEU complexity. Depending on the state and report mapping, the system may automatically determine:
- Required state file format
- Quarterly form code or equivalent state-specific filing option
- Media or file naming setup
- Hidden state-specific report parameters
- Other required defaults that used to be manually selected in the legacy process
This is especially important because some states require unique combinations of settings that are not obvious to end users.
The goal of the new experience is not to create new SUI logic. It is to simplify how existing reporting logic is launched so customers can run the right report with fewer chances for error.
FAQ
Can I run one quarterly SUI report for multiple states at once?
No. The process is state-specific, and each state should be run separately.
Do users still need to know state-specific form codes?
No. The modernized flow is meant to auto-fill or hide those details so users do not have to choose them manually.
Display Tax Jurisdiction on Payline
This feature provides immediate clarity for payroll administrators by displaying surface-level tax information directly on the Payline. In order to improve tax transparency, we’ve updated the Payroll Payline Results screen. Previously, administrators often saw generic labels like 'Home' or 'Work,' which could be ambiguous—especially for employees working in states with complex tax laws or reciprocity agreements.
With this enhancement, we now store and display the specific jurisdiction name, For example, “NE SIT RES (6621)” directly alongside the tax deduction.
Why This Matters
- Instant Clarity: You no longer have to guess which specific tax rule is being applied; it is displayed right in the pay header and pay register.
- Proactive Error Reduction: By seeing the jurisdiction name clearly, you can spot setup issues immediately.
- What changed: Tax jurisdiction names are now surfaced on the Payline, paychecks, and pay registers.
- Business Value: Reduces manual research time and minimizes payroll errors by providing full visibility into tax rule application.
- Compatibility: This is particularly helpful for employees subject to multiple state/local taxes or reciprocity.
Appendix: Bugs Resolved
No additional bug fixes outside of the maintenance releases. Refer to the maintenance release notes for more details.