



October 5, 2026 PowerTime Release Notes
Article Links
Timeline
When will this be released?
October 5, 2026
Is there downtime for this release?
No
Features & Enhancements
Autobreaks - Exclude Time Off
Prevent scheduled time off hours from being reduced by automated break deductions.
Value
Ensure accurate time off calculations without manual intervention. By excluding time off from autobreaks, an employee's scheduled time off hours aren't reduced by an automatic break.
Audience
Administrators and users with permission to configure Payroll settings; however, all users will see the effects once this is configured.
Enablement and Navigation
Navigate to System > Settings > Payroll > Autobreaks.
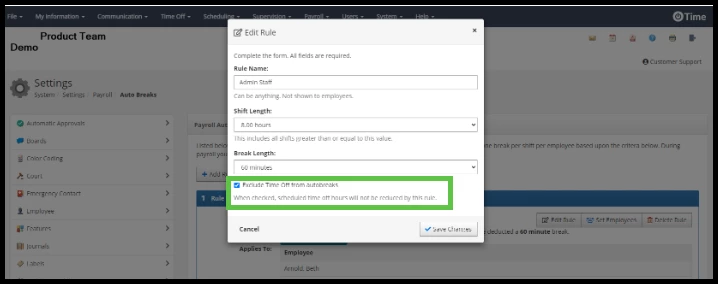
When modifying an existing autobreak rule or adding a new one, you will notice a new option.
Examples and Use
When configuring your organization's autobreaks, you now have the option to completely exclude time off from the break deduction calculation.
From the Autobreaks screen, choose to add a new autobreak or edit an existing one.
Locate the checkbox labeled Exclude Time Off from autobreaks. Check this box to apply the rule.
When this box is checked, the system will ensure that scheduled time off hours are never reduced by the autobreak.
Considerations
For existing customers, this new checkbox will appear on all of your previously configured autobreaks, but it will remain unchecked by default to preserve your current settings. If you would like to apply this new rule to your current autobreaks, simply edit them and check the box.
Department Visibility - View may include no members
Previously each Department required members to have View access to schedules.
You can now configure View permissions to exclude all members. This allows creating PowerTime departments where administrators may retain Edit and visibility access for all users without granting general visibility across the group.
For example, if a PowerTime administrator wants access to view schedules for all users across PowerTime, they can now configure this without allowing the end user employees the same view access.
Value
This update protects schedule privacy.
Previously, if all agency employees were members of a department, they automatically had visibility into the entire agency’s schedule.
Now, you can remove schedule visibility from regular members.
This allows administrators and leadership to view several schedules or everyone’s schedule at once without exposing that private information to everyone.
Audience
Administrators and Leadership: Can configure department view access and view restricted department schedules.
All Employees: Will only see the department schedules they have explicit access to view.
Enablement and Navigation
Navigate to System > General Setup > Departments.
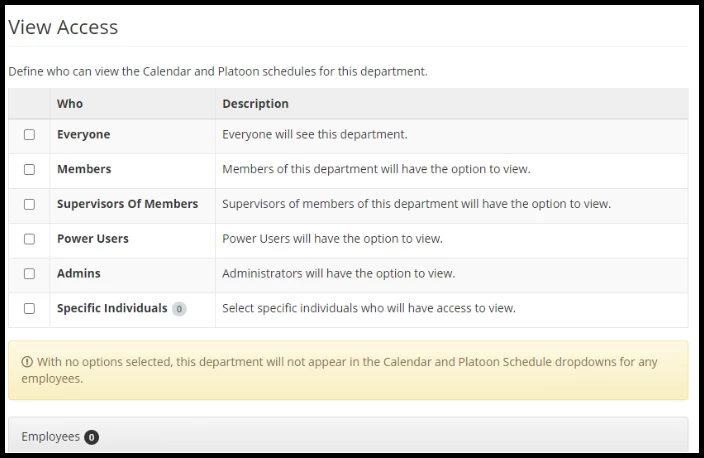
When adding or modifying a group, the View permissions dictate who has visibility into that Department’s schedules. The Edit permissions dictate who has access to view and edit that Department’s schedules on the Calendar Editor.
If you do not see the Departments option in the navigation menu, enable the functionality by going to System > Settings > Features. You may enable Departments, and then log out / back in to see the new options.
Examples and Use
When defining View access for a department, you can now customize exactly who sees the schedule on the Calendar and Platoon Schedules:
-
Uncheck Members: You are now allowed to uncheck the Member option. This ensures that just because an employee is in the department, they do not automatically get to see everyone else's schedule.
-
Custom Combinations: Any other combination of options may still be selected for view access based on your agency's needs.
-
Zero View Access: View access may now be set to 0 (meaning no options are checked). If this occurs, the department name will not show in the drop-down menu on the Calendar and Platoon Schedules.
-
Non-Member Visibility: Non-members will not see the name of the department on the Calendar and Platoon schedules.
-
Empty Views: If an employee does not have access to view any department schedules, navigating to the Calendar or Platoon Schedule screens will simply show empty views.
28-Day Pay Period Overtime Calculations
Value
Previously, payroll date ranges were limited to 1-week, 2-week, or daily/calendar cycles. By adding a 28-day pay period option, agencies can accurately calculate, manage, and export overtime and exceptions across longer operational periods without needing manual workarounds.
Note: Reminder- PowerTime helps export schedule data into whatever payroll software that you use. If your agency pays salary every 2 weeks, but then pays overtime and exceptions every 28 days, then this functionality will help you do this.
Audience
Administrators and users with permission to configure Payroll settings and Payroll Groups.
Enablement and Navigation
You can configure this setting on payroll groups. To apply this to a specific payroll group, navigate to System > Settings > Payroll > Payroll Groups.
If you do not see the Payroll Groups option, navigate to System > Settings > Features, and enable Payroll Groups. You will need to log out / back in to see these changes.
Examples and Use
When defining payroll settings or modifying a payroll group, locate the Payroll Date Range setting. In addition to the standard 1-week, 2-week, and day/calendar options, you can now select 28 Days from the drop-down menu. If you set your Payroll Date Range to 28 Days AND your OT Form Submissions setting is set to OT Forms + Hours, the system will automatically adjust your overtime calculation settings:
-
The OT Calculation Period field will become read-only and will automatically display Calculate OT over 28 days. This locks the setting to ensure the overtime math matches your 28-day pay cycle.
-
The Calculate Overtime After Hours field remains freely definable. You can type in the exact number of hours an employee must work within that 28-day period before they begin earning overtime.
Once these options are configured, the system will automatically apply the 28-day calculation logic to your timesheets and payroll data.
If your agency pays salary every 2 weeks, but wants to export overtime and exceptions every 28 days, you can do this in PowerTime:
-
Navigate to System > Settings > Payroll > Export File Designer.
-
Modify the export that your agency uses for payroll.
-
Option 3 allows you to export Exceptions Only, which means it will exclude all regular or salary hours scheduled and only include overtime, time off, shift differential, or other “exceptions”.
Expanded Shift Differentials
Value
Agencies often require more than the previously allowed five shift differentials. By expanding this limit to 20, administrators have the flexibility to create and maintain highly specific pay rules without running out of slots.
Additionally, a newly updated interface makes it easier to organize these rules, allowing you to easily manage your list and temporarily disable specific rules without losing their place or configuration.
Audience
Administrators and users with permission to configure Payroll settings.
Enablement and Navigation
To access and configure these settings, navigate to System > Settings > Payroll and locate your Shift Differentials section on the left.
Examples and Use
Your existing shift differentials will be listed as expandable rows, allowing you to easily collapse them for a cleaner view of your configuration.
Adding a New Shift Differential
- Click the Add Shift Differential button located at the top of the screen.
- This will add a new expandable row to your list. The new shift differential will default to a Disabled status until you are ready to configure and activate it.
- You can continue adding new rows until you reach the 20-rule maximum. Once 20 shift differentials exist, the Add Shift Differential button will gray out and prevent you from adding more.
Note: On first-time setup, if your agency currently does not have any shift differentials configured or enabled, you will only see Shift Differential #1 as a single collapsible row, which will be set to disabled by default.
Managing and Disabling Rules
- You can disable any active shift differential at any time.
- If you disable a shift differential that sits in the middle of your list, it will not disappear or move to the bottom. It will remain in its exact position on the list so it can be easily found and re-enabled at a future date without needing to recreate it.
Calendar Filtering - Saved Filters and Quick Switch
On both the calendar view and editors, users can save custom calendar filter combinations and easily switch between them, eliminating the need to manually re-select filters every time.
Value
By saving favorite filter configurations and switching between them with a single click, users can reduce repetitive setup.
Audience
All Users
Enablement and Navigation
This feature is automatically active for all users with access to the calendar.
Users can manage and apply saved filters by navigating to either Schedule > Calendar View or Schedule > Calendar Editor and interact with the filters.
Examples and Use
Creating and Managing Saved Filters
You can build a custom filter combination and save it for future reuse using the filter setup menu.
-
Navigate to Calendar View or Calendar Editor.
-
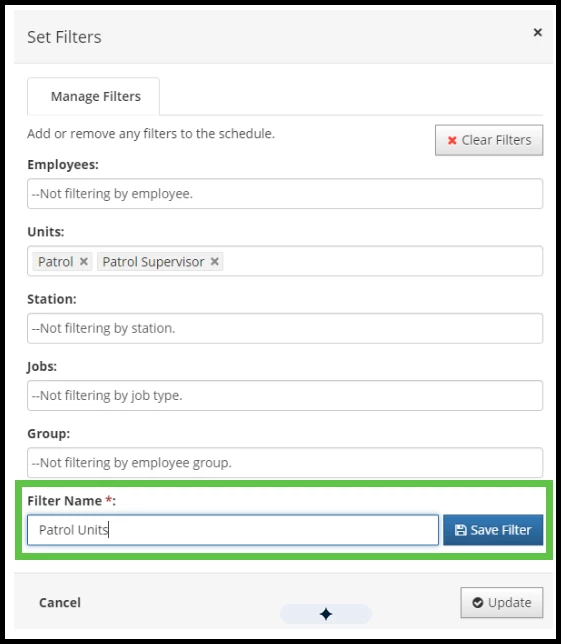
Click the Filter button on the toolbar to open the Set Filters window.
-
Select your desired filter criteria under the Manage Filters tab.
-
Enter a descriptive name in the Filter Name field (up to 50 characters).
Note: The Save Filter button remains disabled until a name is entered.
-
Click Save Filter.
Once at least one saved filter exists, a Saved Filters tab will appear in the modal, listing all your saved configurations alphabetically.
Modifying a Saved Filter
-
Open the Filter menu and select the Saved Filters tab.
-
Click Modify next to the filter you want to update.
-
Adjust your filter criteria or update the filter name on the Modify Filter tab.
-
Click Save Filter to apply the updates to the existing record.
Note: The Save Filter button will remain disabled if no changes have been made to the filter options or name.
Deleting a Saved Filter
-
Open the Filter menu and select the Saved Filters tab.
-
Click Delete next to the target filter.
-
If you delete the filter currently applied to your calendar, the applied criteria will clear, the dropdown will reset to -- None --, and the calendar will return to an unfiltered state.
Quick-Switching Saved Filters on the Calendar
If you have created saved filters, a quick-selection drop-down menu appears directly on the toolbar in both Calendar View and Calendar Editor.
-
Selecting a Filter: Choose any saved filter from the dropdown to instantly update your calendar view. All saved filters are listed alphabetically and are accessible regardless of which calendar view you used to create them.
-
Clearing Filters: Select No Filter from the top of the drop-down list to clear all filter criteria. When you apply no filters, the Filter button displays its standard color; when any filter is active, the Filter button turns red to visually indicate an active view.
-
Viewing Unsaved Filters: If you manually adjust criteria in the filter without saving it as a preset and click Update, the drop-down menu displays Viewing Unsaved Filter. Selecting a saved filter from the drop-down while viewing unsaved criteria will discard the temporary selections and apply the chosen preset.
Considerations
-
Multi-Department Access: Saved filters are isolated by department. If you have access to multiple departments, a saved filter created for Department A will not pull in or display data from Department B when selected.
-
Device Sync & Session Persistence: Your active filter selection and saved presets persist server-side and automatically sync across devices, browsers, and future login sessions.
-
Removed System Options: If a saved filter includes an option that was later deleted from the system (such as a removed station or a departed employee), the filter will silently drop the missing item and successfully apply all remaining valid criteria.
Appendix: Bugs Resolved
| Feature Issue | New Behavior |
| Duplicate payroll date ranges displayed in drop-down menus when Payroll Groups are enabled AND there are deleted payroll groups. | Dates no longer duplicate in the drop-down menu. |
| When using Scheduling > Templates > Unit Templates > Visual Editor, the screen no longer allows dragging to add requirements. Users must individually click each square to add requirements | Users may drag their cursor to smoothly add staffing requirements to this screen. |