



Benefits Release Notes Summer 2026
Article Links
Timeline
When will this be released?
- UAT Preview Window: July 2, 2026 at 5 AM PST to July 30, 2026.
- Production Availability: July 30, 2026 at 5 AM PST.
Is there downtime for this release?
No.
Open Enrollment Navigation
This feature delivers a comprehensive refresh of the open enrollment (OE) experience. With this release, we’ve changed the following.
- Replacing the legacy top navigation with a modern side-stepper navigation.
- Introduced admin customization capabilities.
- Improved plan selection, cost visibility, and enrollment validation.
Open Enrollment
Redesigned Side Navigation and Stepper
The enrollment flow now uses a side navigation stepper, replacing the previous top navigation. Employees see a clear, step-by-step path through enrollment (Welcome > Plan Steps > Review & Submit) and can navigate between completed steps without the old "go back" pattern.
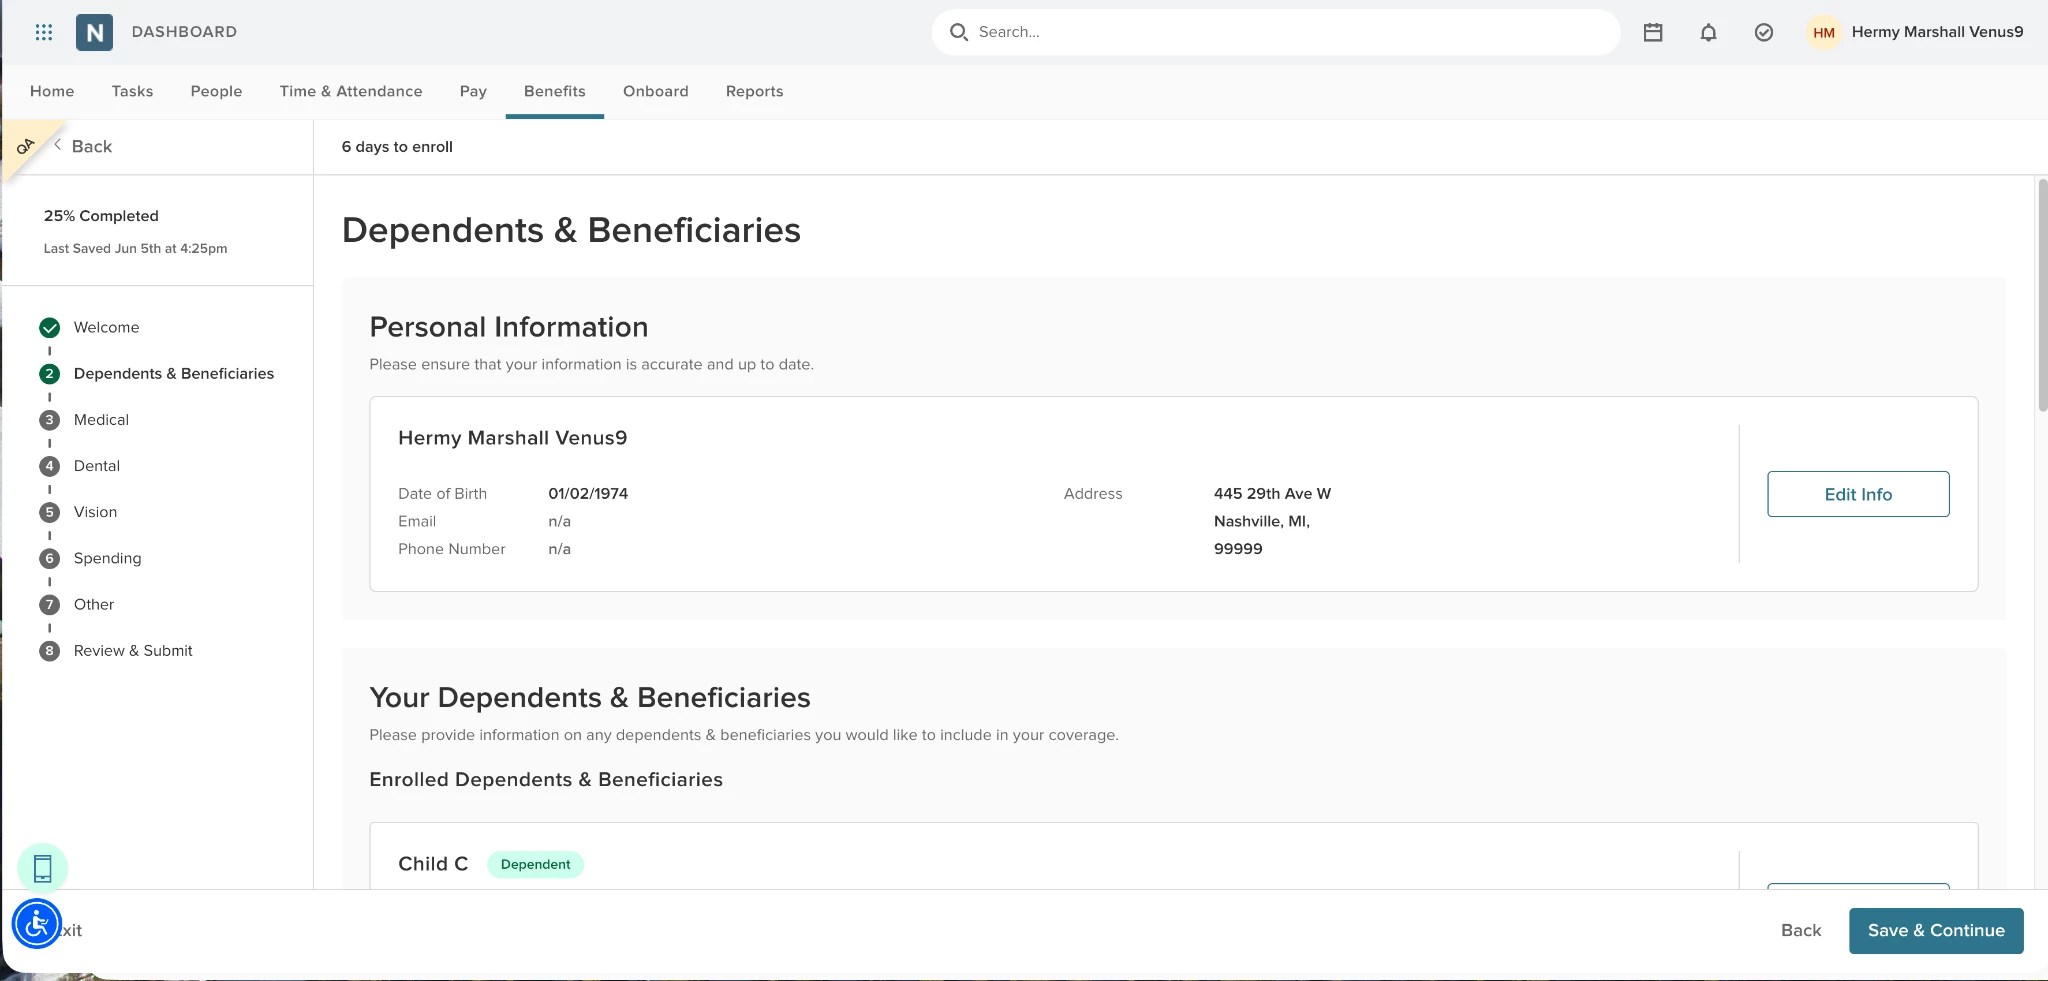
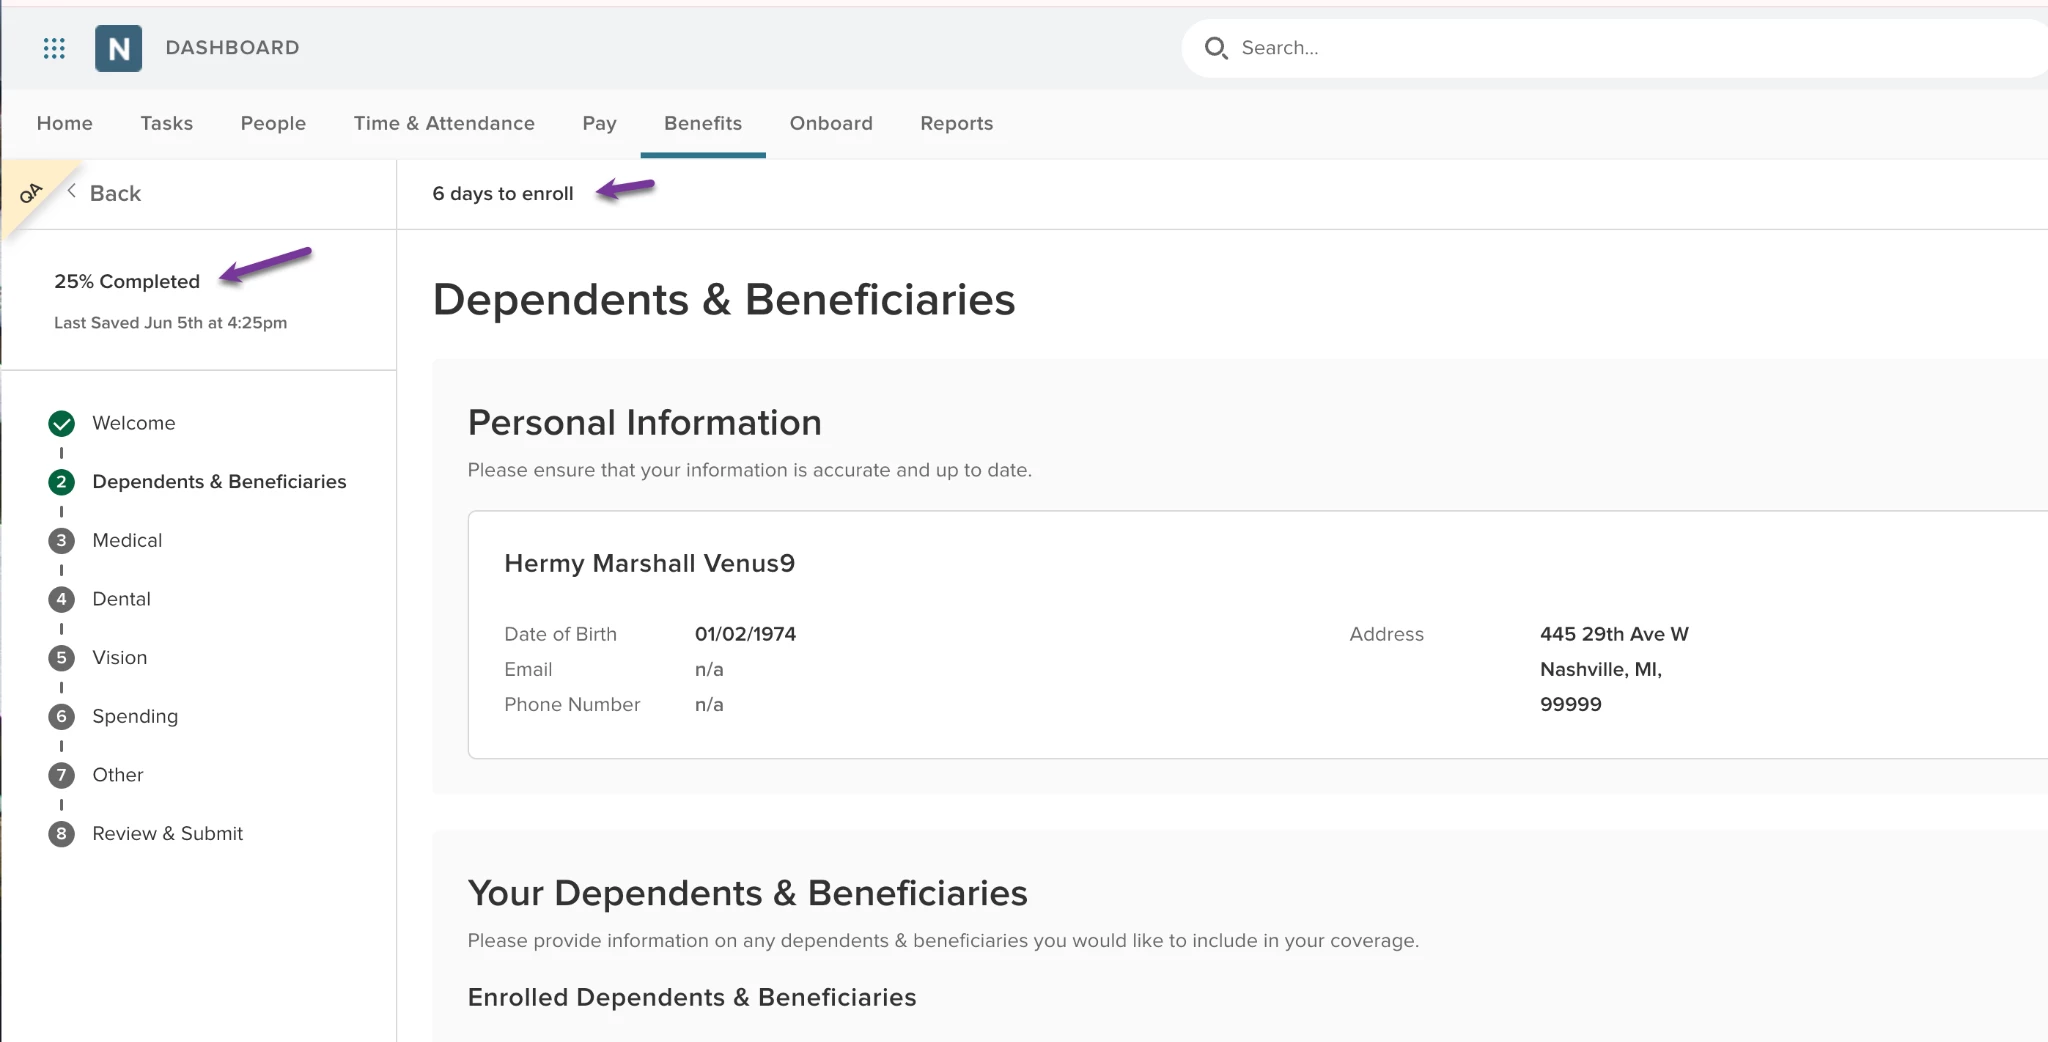
Progress Tracker and Enrollment Countdown
A visual progress tracker now shows employees their completion status across enrollment steps, with clear indicators for completed, in-progress, and upcoming steps. An enrollment countdown timer displays time remaining until the enrollment deadline.
Estimated Cost and Shopping Cart
Employees can now see their estimated benefit costs at all times using a persistent cost panel that updates in real-time as plans are selected or deselected.
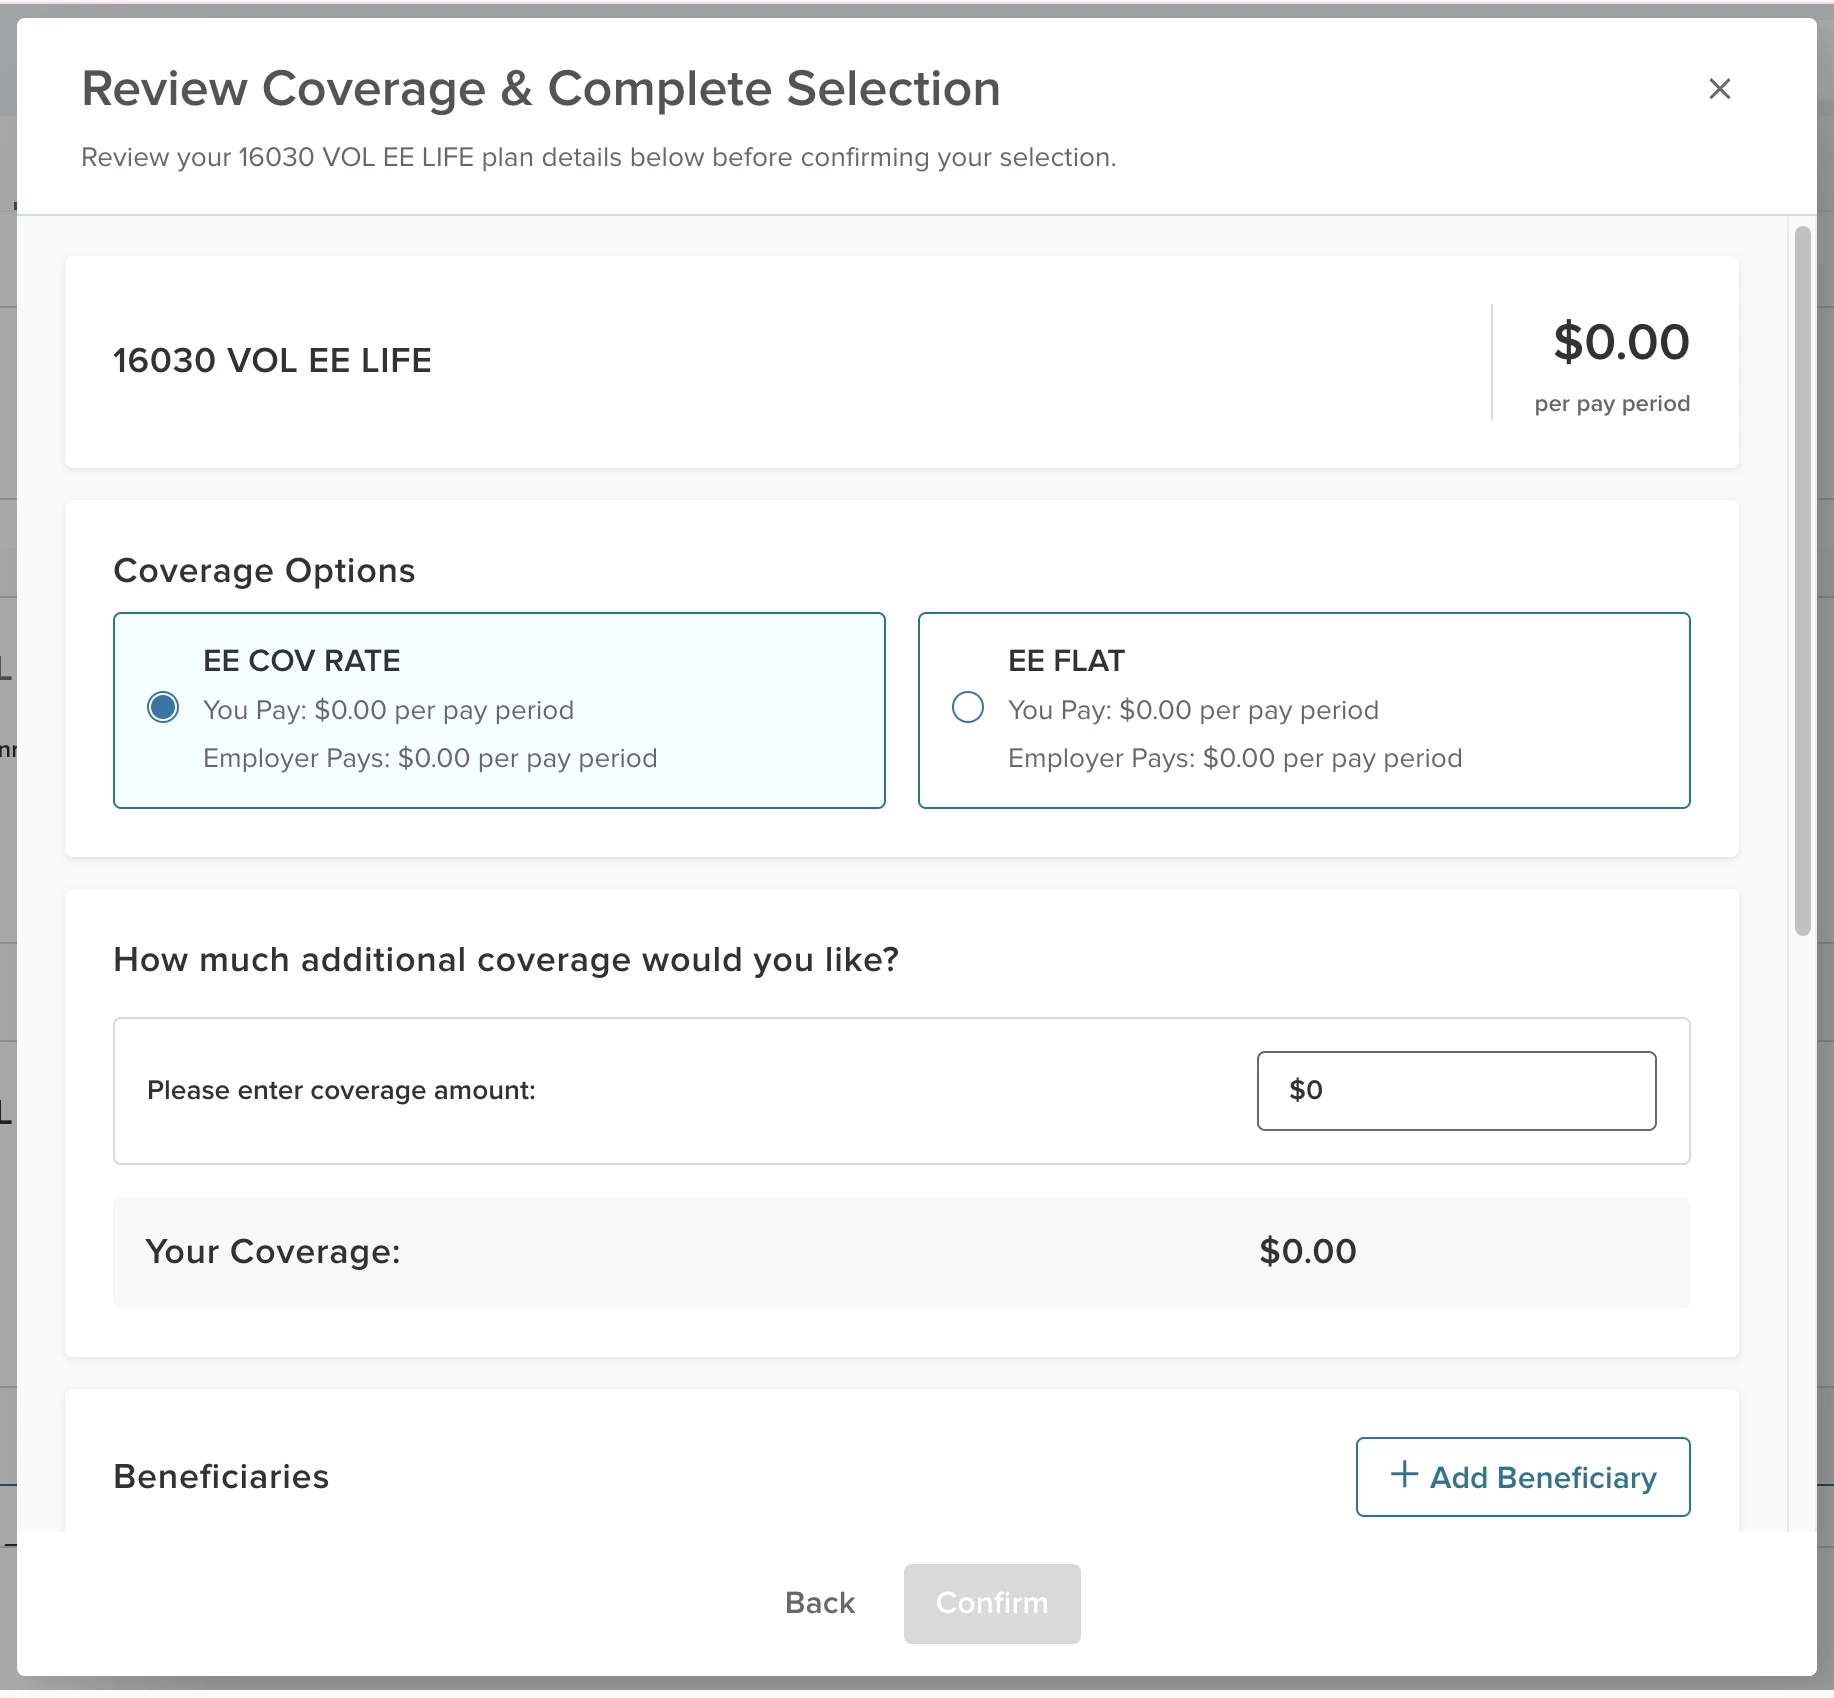
Modernized Plan Card Layouts and Selection
Benefit plans now have new card-based layouts for all plan types — Medical, Dental, Vision (MDV), as well as spending, retirement, and other plans. Employees can select/deselect plans, choose dependents/beneficiaries, and move forward seamlessly.


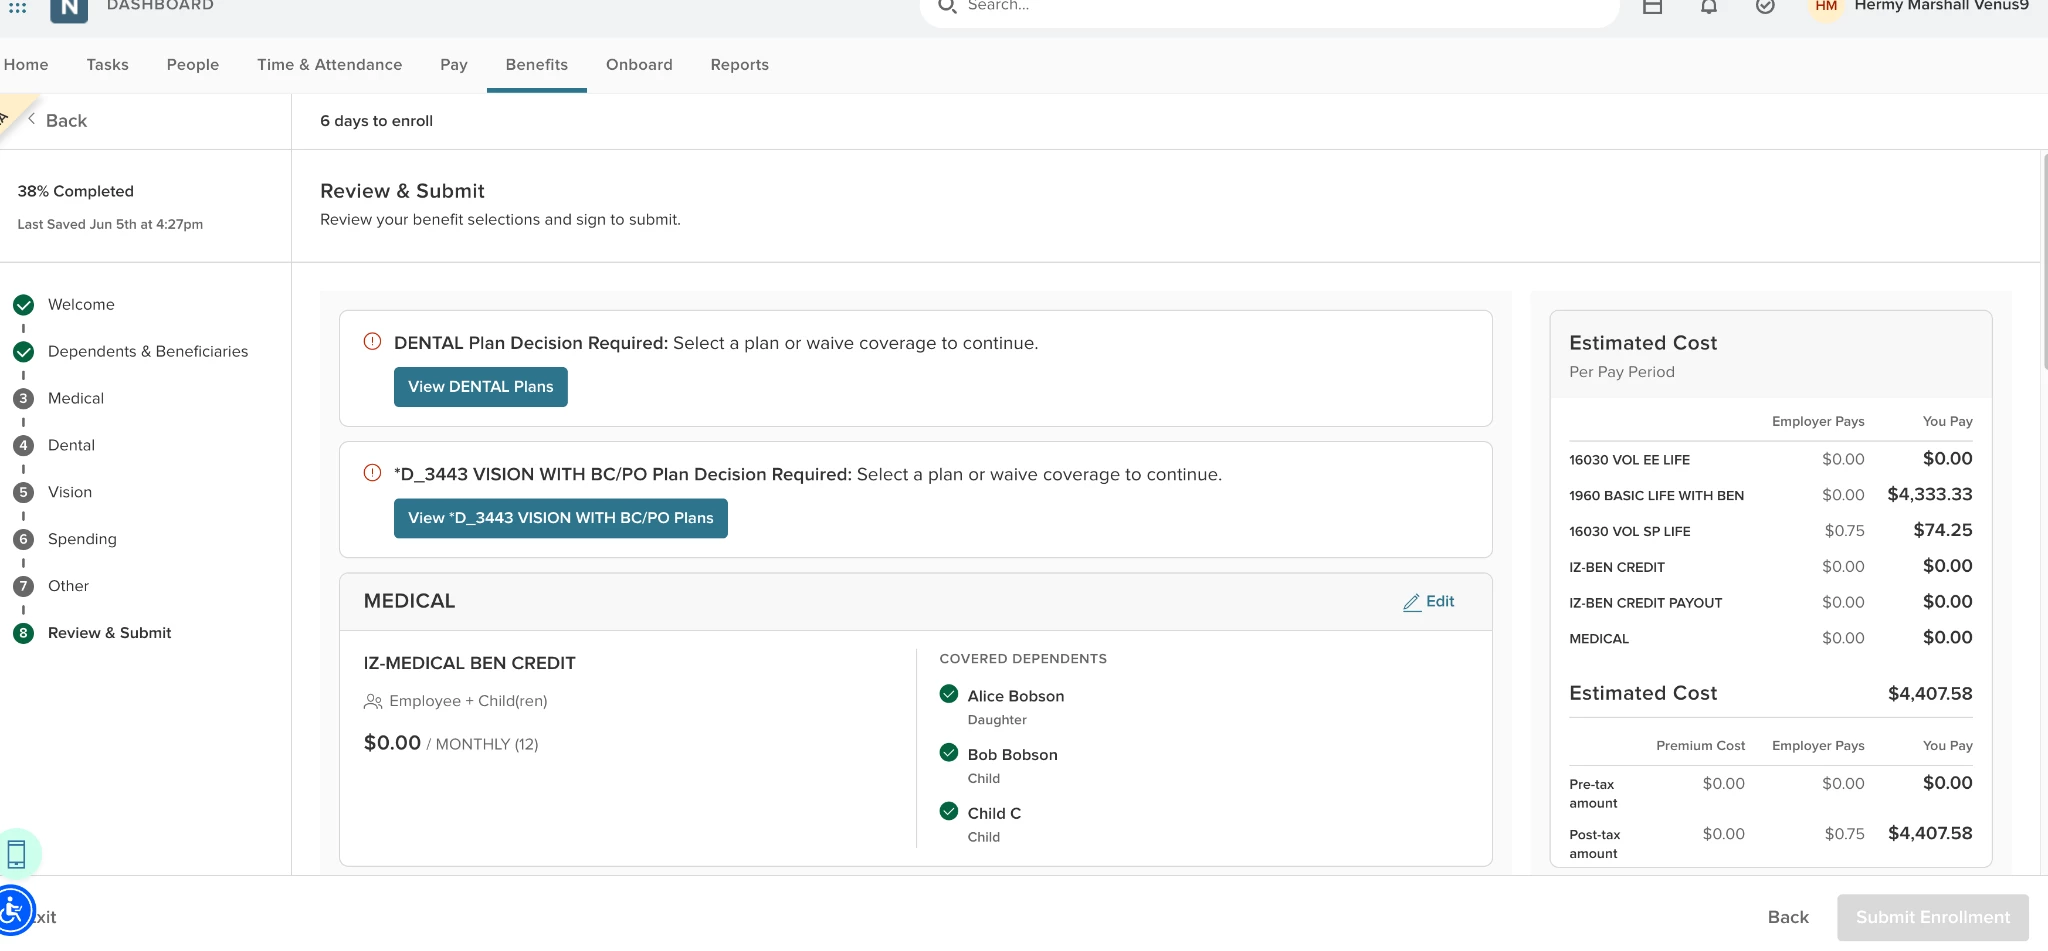
Review and Submit
A new Review & Submit step summarizes all elections across every enrollment step, validates selections (such as missing dependents and invalid dependencies), and blocks submission until issues are resolved.
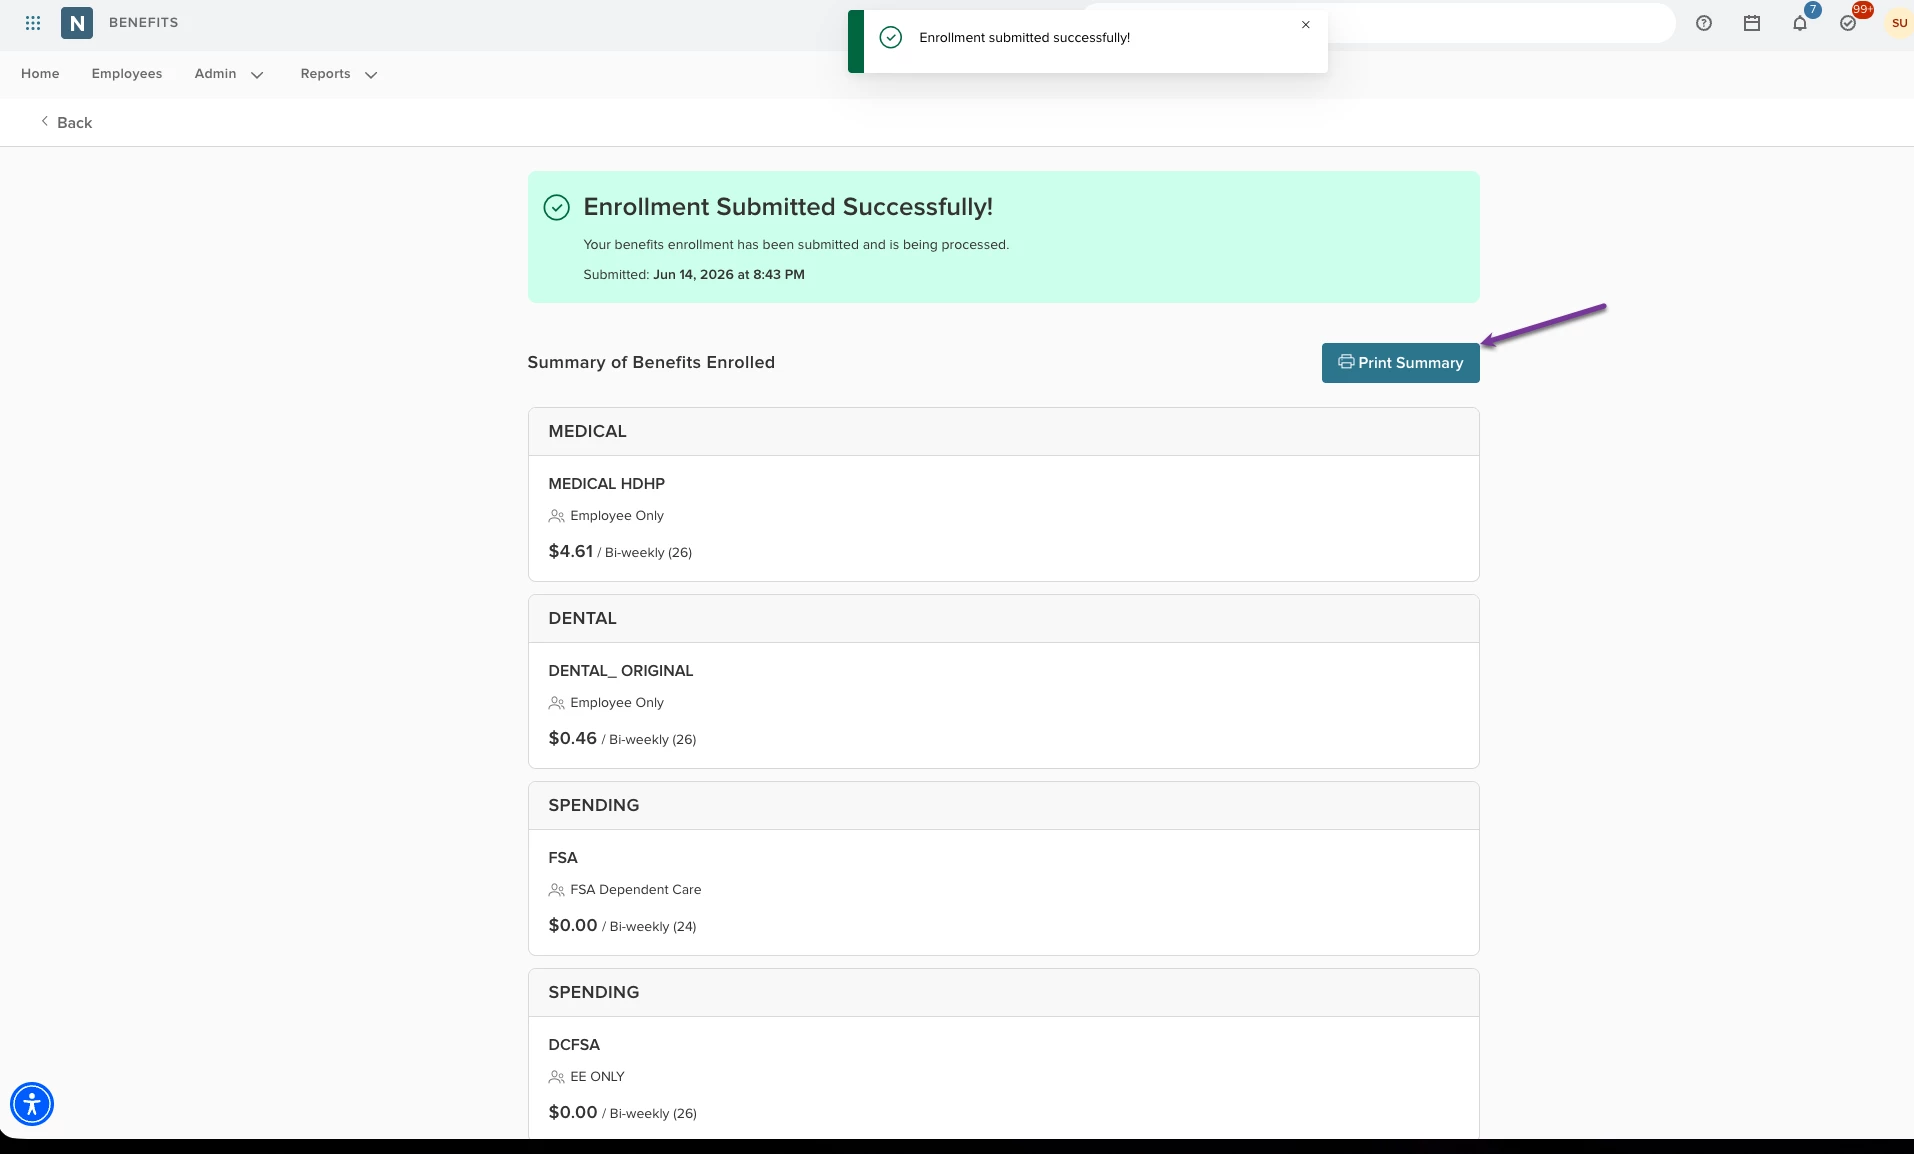
Summary Page (Print)
Employees will be able to review and print a benefit summary page after enrollment.
Customize Navigation
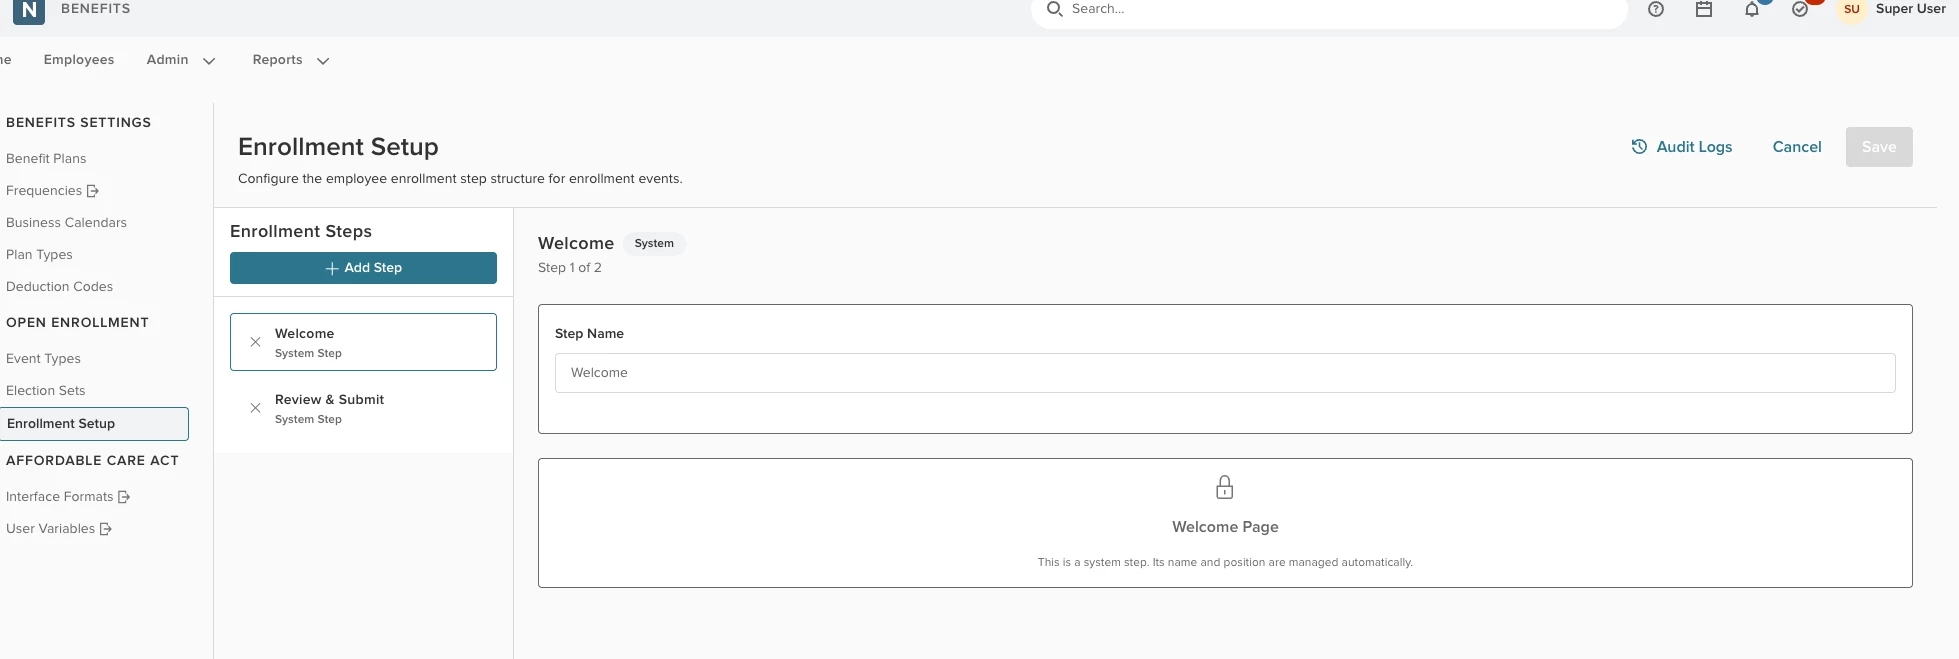
Admins can now customize the open enrollment step sequence — naming each step, ordering them, assigning election sets, and previewing the full employee-facing flow. Welcome and Review & Submit remain locked steps.
Workspace Overview
The page is split into two primary zones.
- Left Sidebar (Enrollment Steps): Shows a master list of your steps and sub-text counter tracking X steps configured. You will never see fewer than two steps here.
- Middle Configuration Section: This is your primary sandbox. It shows the name and number of the step you are actively viewing or editing.
System Guardrails: The Welcome and Review & Submit steps are baseline system steps. They are permanently locked and cannot be deleted, renamed, or reordered.
Step 1: Handling the Empty State
If your company event has no custom configurations or plans assigned yet, the interface shows the default empty state.
- The middle section header shows as Untitled Step.
- A center icon will appear with the heading No plans available to order alongside a sub-text guide to prompt your setup.
Note: If no custom navigation steps are added at all, the system automatically falls back to the legacy standard sequence: Medical > Dental > Vision > Spending > Other Benefits.
Step 2: Adding a New Custom Step
To build a new step in the enrollment flow, select Add Step at the top of the left sidebar.
Field Requirements and Validations
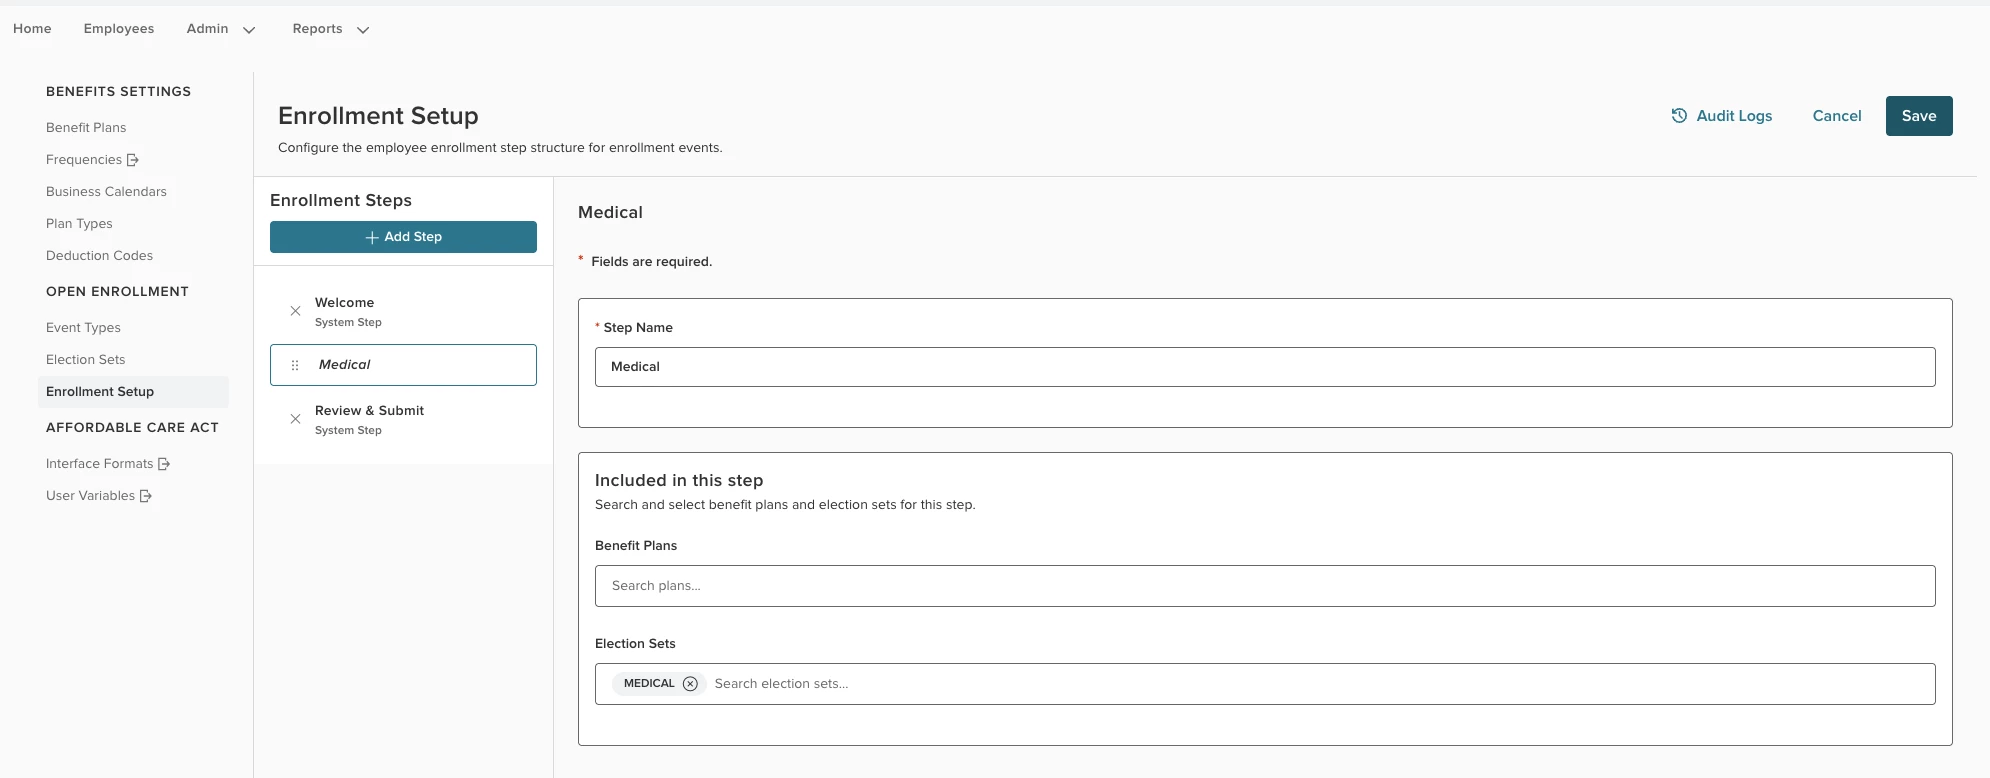
The middle workspace will update to show the step creation fields. Both fields are strictly mandatory and feature a red asterisk (*).
- Step Name*
- Format: Open text box with a strict 100-character limit.
- Uniqueness Rule: Every step name must be completely unique. If you attempt to save a duplicate name, the system blocks it and throws this validation message: [Step Name] already exists.
- Benefit Plans* (Step Configuration)
- Format: Use the search bar to locate benefits and add them to the step as a pill-based list. At least one plan or election set is required to save the step.
- Save Button Logic: The main Save button remains completely disabled until both a valid Step Name and at least one plan/election set are assigned.
Step 3: Managing Plan and Election Set Logic
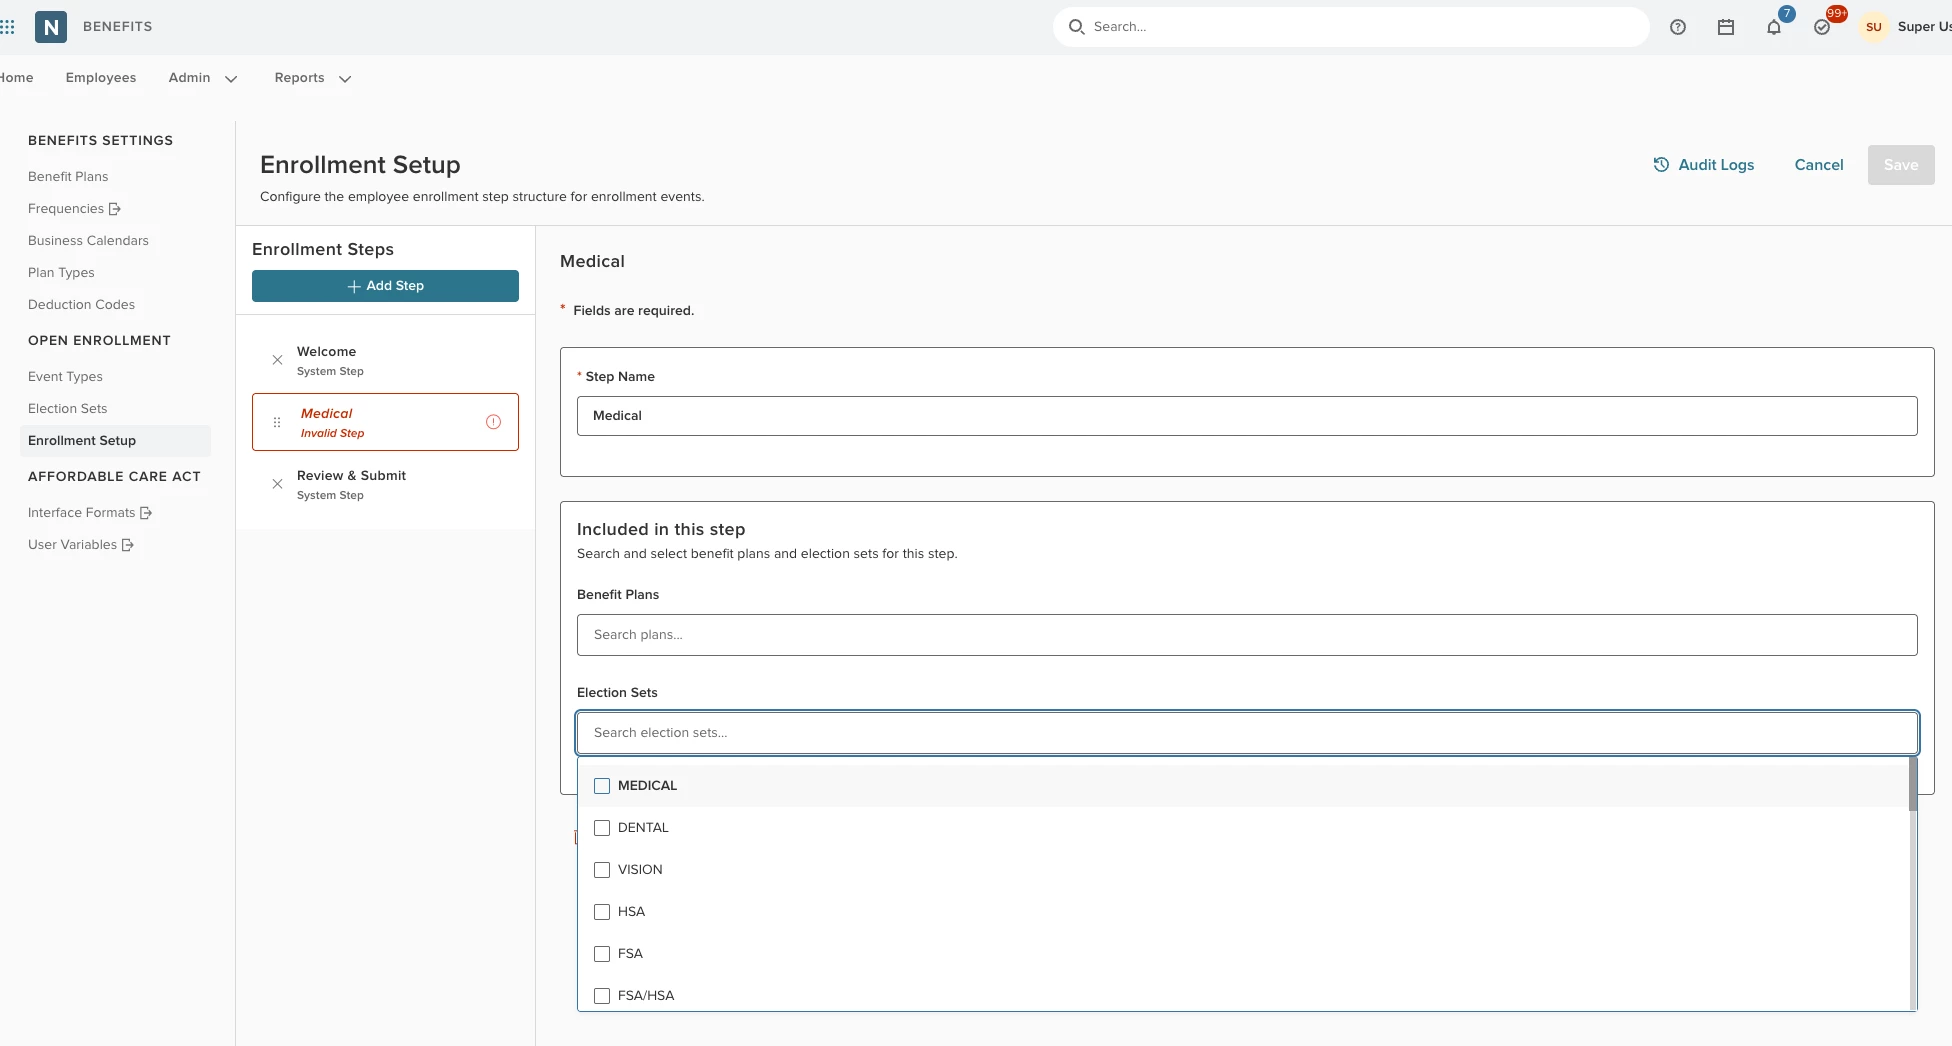
To prevent configuration conflicts, the system enforces a strict single-step assignment rule for plans and election sets.
- The Exclusion Rule: Once a plan or election set is assigned to a step, it is greyed out across the rest of the application. A plan cannot exist in two places at once.
- Election Set Isolation: If you select an individual plan (for example, HDHP) that belongs to a hard-coded election set with other plans (for example, PPO), the system locks down that entire parent set. You will not be allowed to distribute remaining sibling plans across other custom steps.
- Hover Explanations: If a plan or set is greyed out during selection, hovering your mouse over it reveals the exact system block.
- Plan has already been added as an election set.
- Plans within this election set have already been added.
Step 4: Reordering Steps and Plans
Ordering Benefit Plans (Within a Step)
Once you add two or more plans to a single step, a drag-handle icon appears next to each plan pill.
- Mouse/Trackpad: Select and drag the handle vertically to set your layout sequence.
- Accessibility alternative: Highlight the plan pill and use the Up and Down arrow keys on your keyboard to shift its sequence.
Ordering the Main Steps
You can alter the chronological flow of custom steps in the left sidebar by dragging the steps into your preferred order between the locked Welcome and Review & Submit baselines.
Step 5: Validating Error States and Invalid Setups
External changes can cause an invalid workflow. For example, another administrator deleting an underlying insurance plan, or editing an election set after you have completed setup. The system runs automatic conflict checks upon loading and navigating.
Orphaned Steps (Incomplete Step)
- The Cause: A step loses all its assigned plans due to an external administrative deletion.
- System Action: The left sidebar highlights the broken step in red with an Incomplete Step warning flag.
- Enrollment Impact: This step is automatically skipped in the live employee preview tool and active open enrollment windows.
Conflict Detection (Multi-Step Plan Assignment)
- The Cause: External changes cause a Plan ID to accidentally exist across multiple steps (either directly or nested within an election set).
- System Action: Both conflicting steps are flagged with a red error element.
- Validation Messages:
- If a plan is duplicated inside a single step or across multiple steps, it triggers this message: Invalid plan or election set.
- An inline message specifies the exact error: [X Election Set/Plan] already exists. If a single step suffers from multiple overlaps, it shows this message: Multiple election sets (or plans) already exist.
Additional Functionality
When an employee logs into their enrollment event, the system will review to format their personalized workflow.
- Eligibility Filtering: The system checks the employee's attributes against your configured plans.
- Step Suppression: If an employee is determined to be completely ineligible for every single plan mapped inside a particular step, the system completely hides that step from their progress bar.
- Seamless Collapse: When a step is suppressed, the remaining sequence dynamically collapses to close the gap. For example, if an employee skips Step 2, Step 3 instantly becomes their visual Step 2, ensuring an intuitive user interface.
- Plan Visibility: Inside any visible step, the employee will only see the specific plan options they are explicitly eligible to purchase.
Multiple Election Sets on a Single Page
Previously, system cross-dependencies limited how you could group plans. For example, a dental plan tied to a medical enrollment could not live on the same step. Also, supplementary coverages like Life, Retirement, Critical Illness, and Accident were forced together into a generic step.
This feature is automatically tied to your custom step layouts. Simply navigate to Open Enrollment > Enrollment Setup to begin grouping your plans and tailoring your steps.
With this update, you can break through those boundaries.
- Advanced Plan Grouping: Group previously incompatible, dependent plans (like Medical and Dental) into a single, cohesive step.
- Granular Plan Separation: Take control of your supplementary plans. You can now pull Life, Retirement, or Indemnity plans out of the generic bucket and isolate them into their own dedicated custom steps.
Employee Experience
When an admin places multiple election sets or plans onto a single enrollment step, the employee is met with a sleek, self-correcting page designed to reduce choice fatigue and streamline decision-making.
- Grouped Header Navigation and Visual Anchoring
When an employee encounters a multi-plan step (such as Basic Life and Voluntary Life grouped together), the platform dynamically renders a persistent directory at the top of their workspace.- The Step Directory: This acts as a real-time table of contents for that specific step (such as showing FSA, Life, and others).
- Active State Tracking: As the employee completes a plan selection, a green checkmark instantly appears next to that category in the top index, providing immediate visual confirmation of progress.
- Smart Anchoring: The directory doubles as a navigation shortcut. If an employee clicks on any category in the top list, the system automatically scrolls to and expands that specific card below.
- Streamlined Selection Workflow
We’ve engineered a smart collapse sequence to keep the user focused on one choice at a time without losing the bigger picture.- Independent Selection: Employees can freely review and select a plan for one benefit type without being forced to choose or commit to the others simultaneously.
- Modal Confirmation: Clicking Select Plan triggers a popup summarizing their specific plan choice, coverage tier, and precise cost impact.
- Auto-Collapse and Sequential Reveal: The moment the employee confirms their choice in the modal, the expanded plan card automatically collapses into a clean summary row. Simultaneously, the next pending plan category in the group instantly opens, guiding them forward seamlessly.
- Inline Editing: Changed your mind? No problem. Clicking anywhere on a collapsed summary row instantly re-expands the card so the employee can modify their selection on the fly.
Benefit Attributes / Compare Plans
Employees can now compare benefit plan options side-by-side during open enrollment, helping them make more informed decisions about which plans best fit their needs. Administrators gain new tools to configure, preview, and audit the attributes shown in the comparison view.
Attribute Setup in Plans
Administrators can now configure benefit attributes on each plan, which are the key details employees see when comparing plans.
- Add, edit, and delete benefit attributes per plan.
- Set display order, category, type, frequency, and value for each attribute.
- Attributes are locked from editing during an active open enrollment event.
Step 1: Navigating the Initial Screen (Empty State)
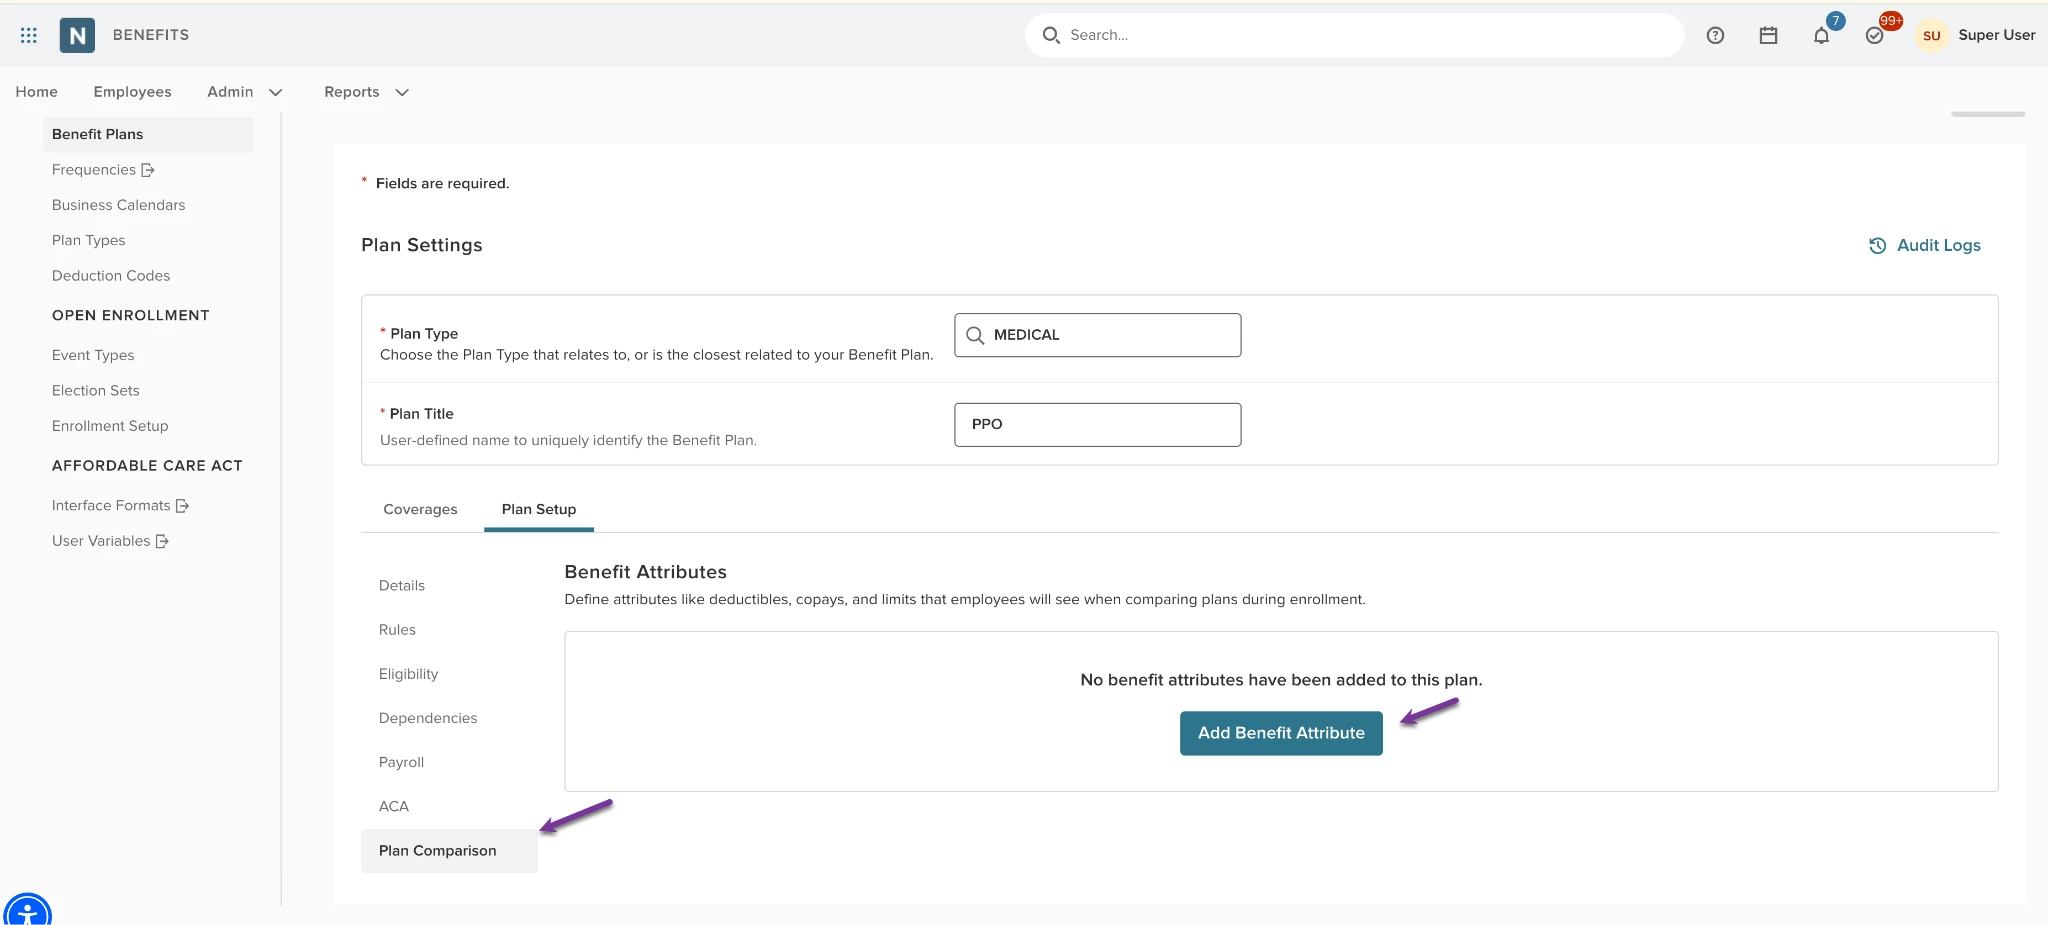
When you open the Plan Setup tab and select Benefits Attributes for a plan coverage that hasn't been configured yet, you will see the initial empty dashboard.
- What you'll see: A card labeled Benefit Attributes with this notification: No Benefit Attributes.
- Default Date Range: System-generated new configurations have an effective date range of 01/01/0001 - 12/31/3999 by default.
- Getting Started: Select Benefit Attribute in the center of the page to create your first attribute card.
Step 2: Creating a New Benefit Attribute
Selecting the add button opens a detailed configuration block split into core information segments.
Section 1: Basic Information
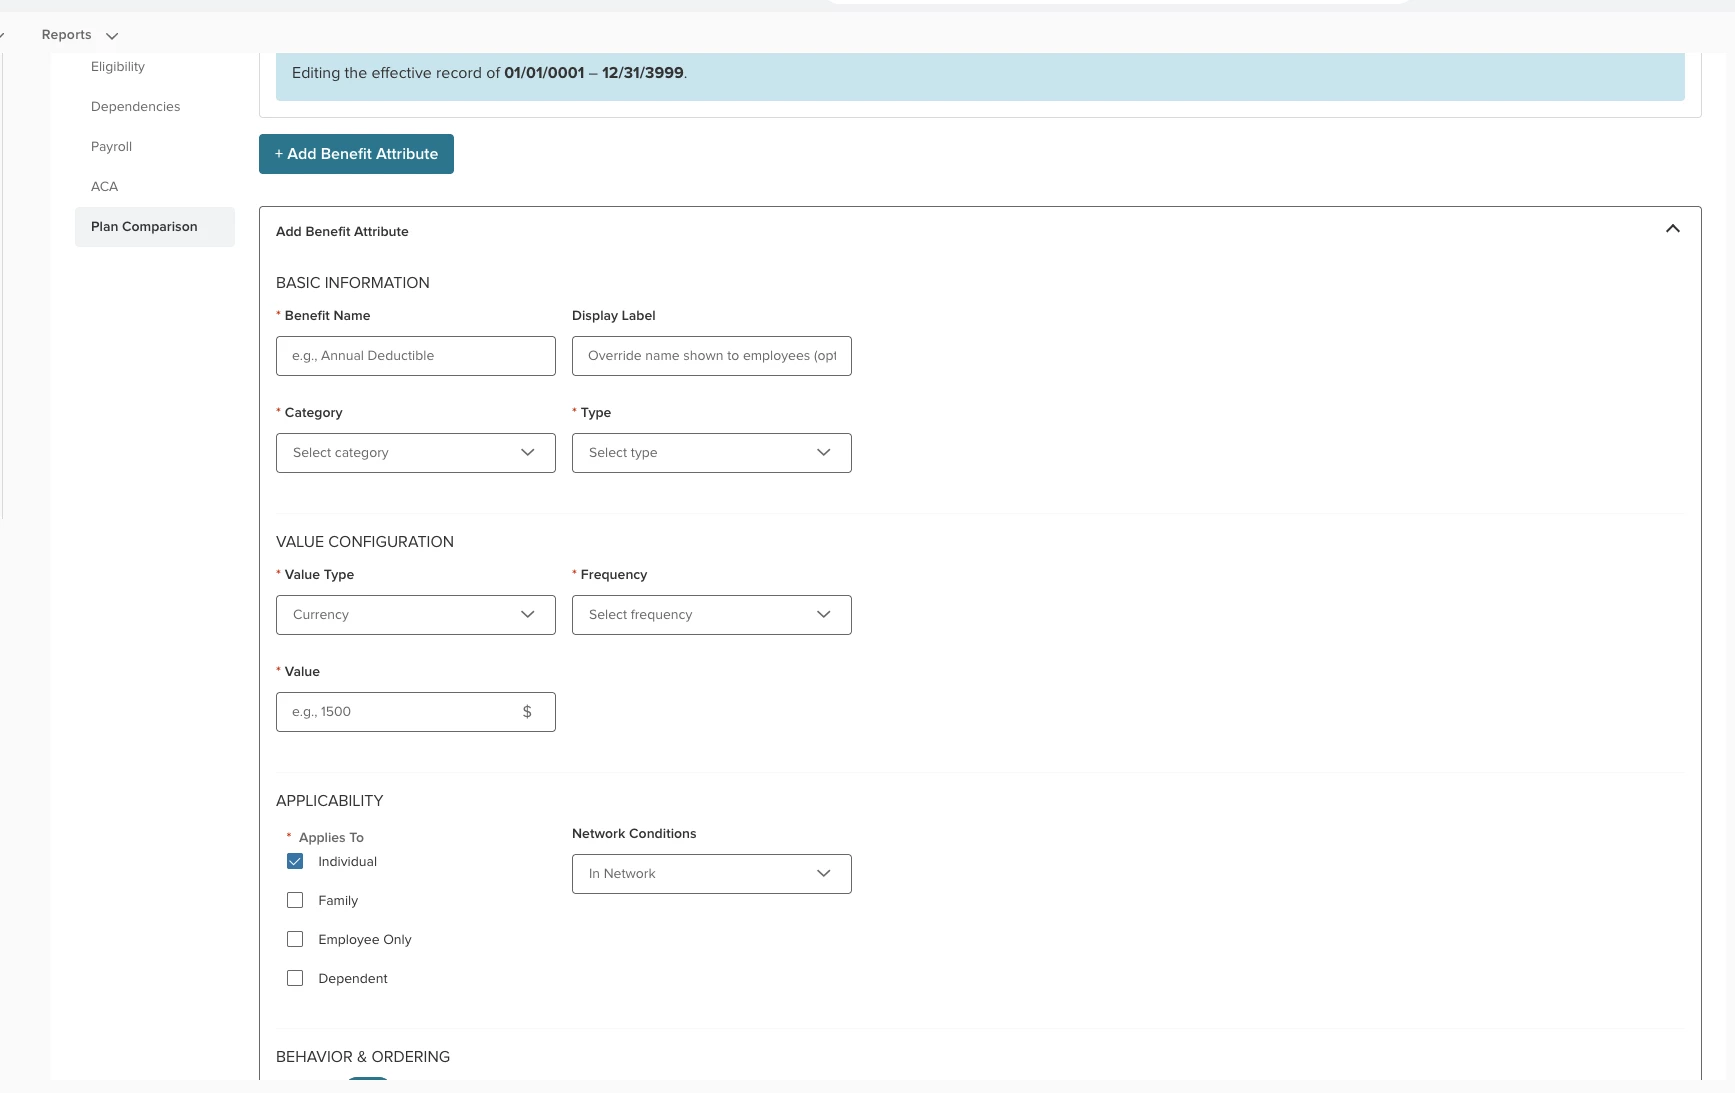
- Benefit Name (Required): Enter a clear name for the benefit (such as Individual Deductible). This is free-form text.
- Display Label (Optional): If you want employees to see a different name during self-service enrollment, enter an override label here. If left blank, the Benefit Name is shown.
- Category (Required): Select the corresponding classification from the dropdown menu.
- Copay.
- Coinsurance.
- Deductible.
- Maximum.
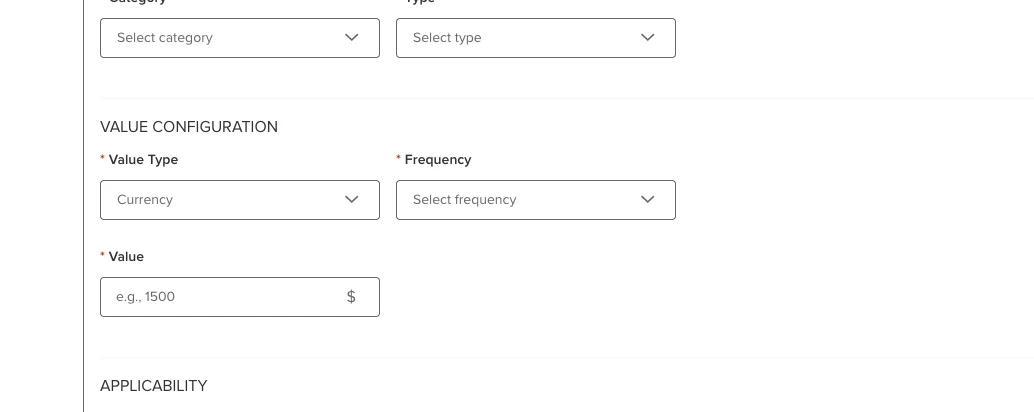
Section 2: Value Configuration
- Value Type: Choose how the system interprets the value. Currency is the default selection.
- Currency.
- Percentage.
- Text.
- Frequency (Required): Choose how often this benefit logic applies from the dropdown menu.
- Per Year.
- Per Visit.
- Per Occurrence.
- Lifetime.
- Value (Required): Input the numeric cost or percentage value.
- Validation Rule: Must be a whole number between 1 and 999. No decimals or zeros are permitted.
- Validation Rule: Must be a whole number between 1 and 999. No decimals or zeros are permitted.
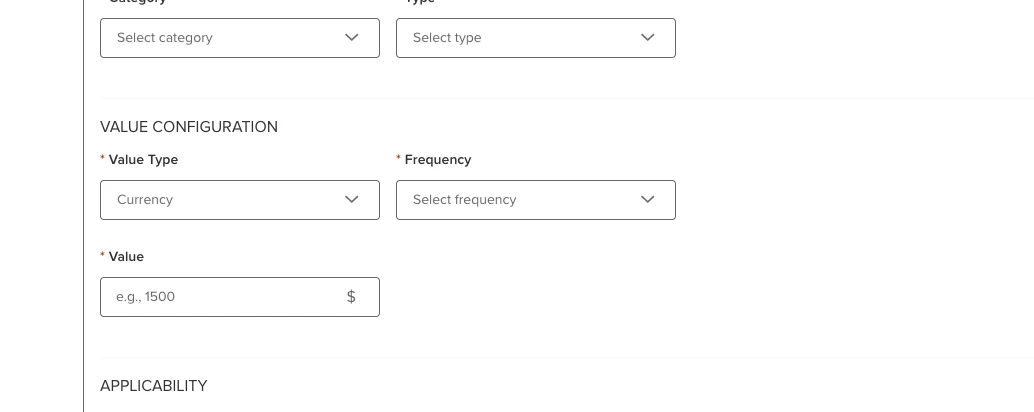
Section 3: Applicability
- Network Conditions: Choose the network tier. In Network is the default selection.
- In Network.
- Out of Network.
- None.
- Applies To (At least one required): Check the boxes for who this attribute applies to. Individual is the default selection.
- Individual.
- Family.
- Employee.
- Dependent.
- Beneficiary.
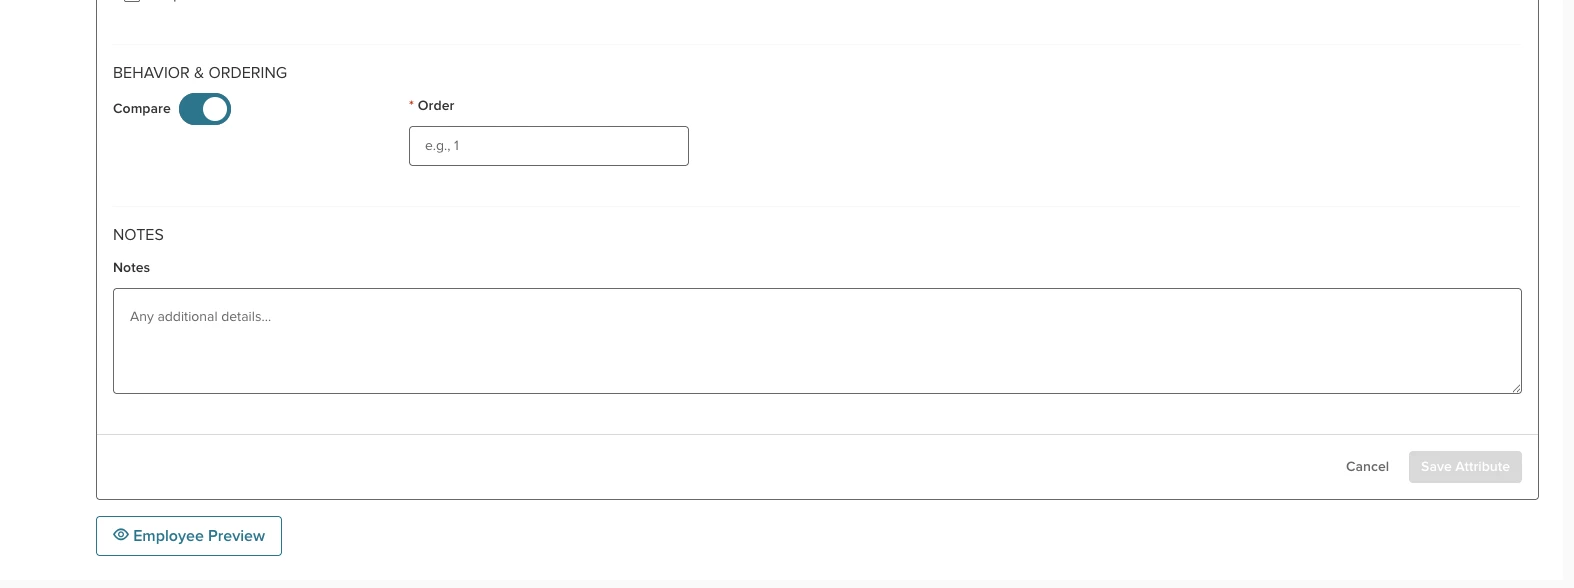
Section 3: Behavior & Ordering
- Compare Toggle: The default selection is Yes. When active, this specific attribute shows within the employee comparison tool and layout previews.
- Order (Required): Input the priority display position layout. Must be a whole number (1–999).
- Notes (Optional): Free-form text box to add any extra descriptive details or fine print for administrative tracking.
Saving or Canceling
- To commit the configuration, select Save Changes. All required fields must be completely filled out to save successfully.
- To discard your input, select Cancel. A confirmation popup will appear. Select Discard Changes to exit without saving, or Keep Editing to return to your current form card.
Step 3: Managing the Benefit Attribute Table
Once you successfully save an attribute, it transitions into a structured overview table grouped under specific category headers (Cost Sharing, Limitation, Service, or Coverage).
Table Column Structure
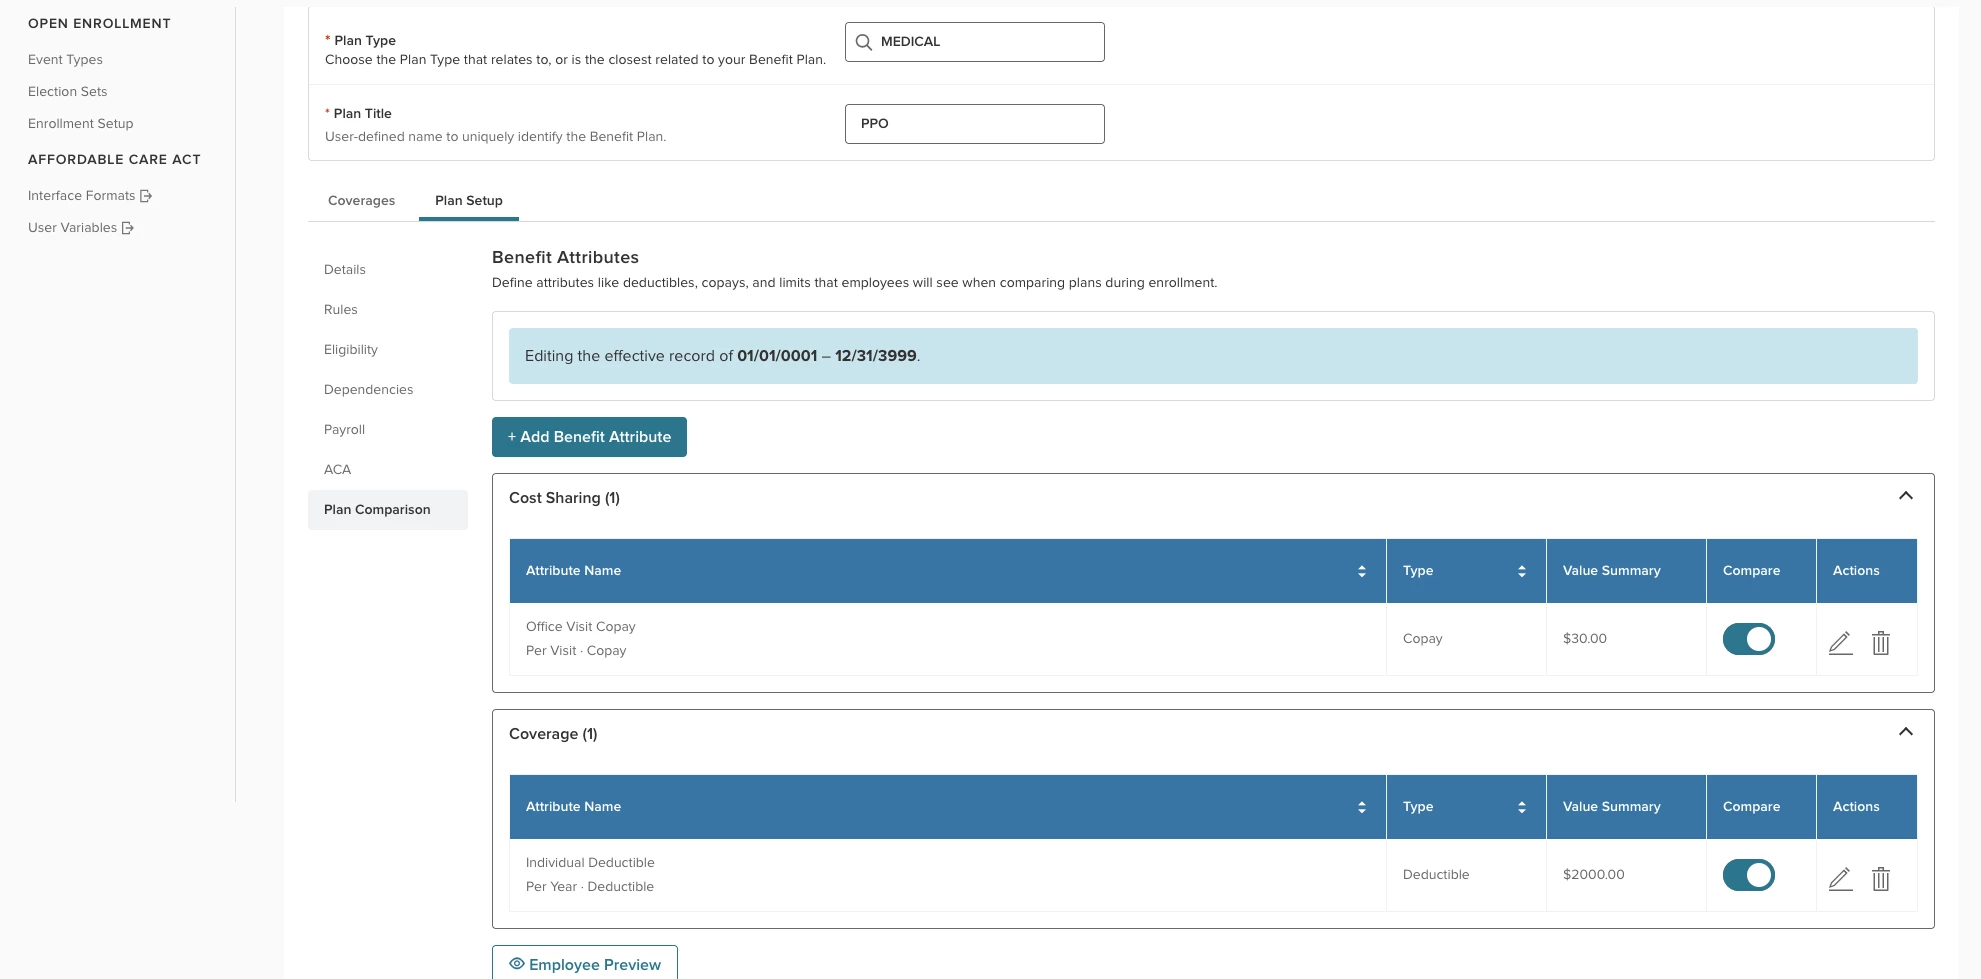
This table contains the following structural components to track your plan data at a glance.
| Column Name | Behavior and Functional Description |
|---|---|
| Order | Determines the exact visual layout line positioning for user views. |
| Attribute Name | Shows the defined name. Sortable column (A-Z, Z-A). New additions default to the bottom of the stack. |
| Type | Shows the selected benefit type. Sortable column (A-Z, Z-A). |
| Value Summary | Provides an aggregated preview string combining your value and network rules (such as $1,000). |
| Compare | Inline toggle switch showing a Hide/Show option to quickly alter employee visibility. |
| Actions | Access point for quick updates and data deletion options. |
Step 4: Editing or Updating Existing Attributes
To change an attribute that has already been saved, locate the entry in the table and select the Edit (pencil) icon.
Note: You can only edit one attribute card at a time. If you are in the middle of creating a separate attribute, you must save or cancel it before editing an existing one.
When you select Edit on a saved record page, an Edit Attribute Record popup will appear and show two distinct routing tracks.
Option A: Edit the attributes of this record.
- When to use: Choose this option if you want to make a direct correction or update to the values within the current active tracking file.
- Action: Select this radio button, select Confirm, and modify the fields directly on the screen layout.
Option B: Create a new effective record.
- When to use: Choose this option when the core plan configuration is altering for a future policy timeline, and you need to protect historical data integrity.
- Action: Select this radio button to reveal the Effective as of field. Enter the specific date (MM/DD/YYYY) when these new criteria take effect, and select Confirm.
Step 5: Deleting an Attribute
If an attribute was added in error, or is no longer required for plan design, you can delete it.
- Locate the attribute entry on the table.
- Hover over the trash can icon under the Actions column (hover text will show Delete).
- Select the icon to prompt a confirmation window.
- Confirm deletion to permanently remove the item from the localized tracking block.
Compare Plans in Open Enrollment - Employees
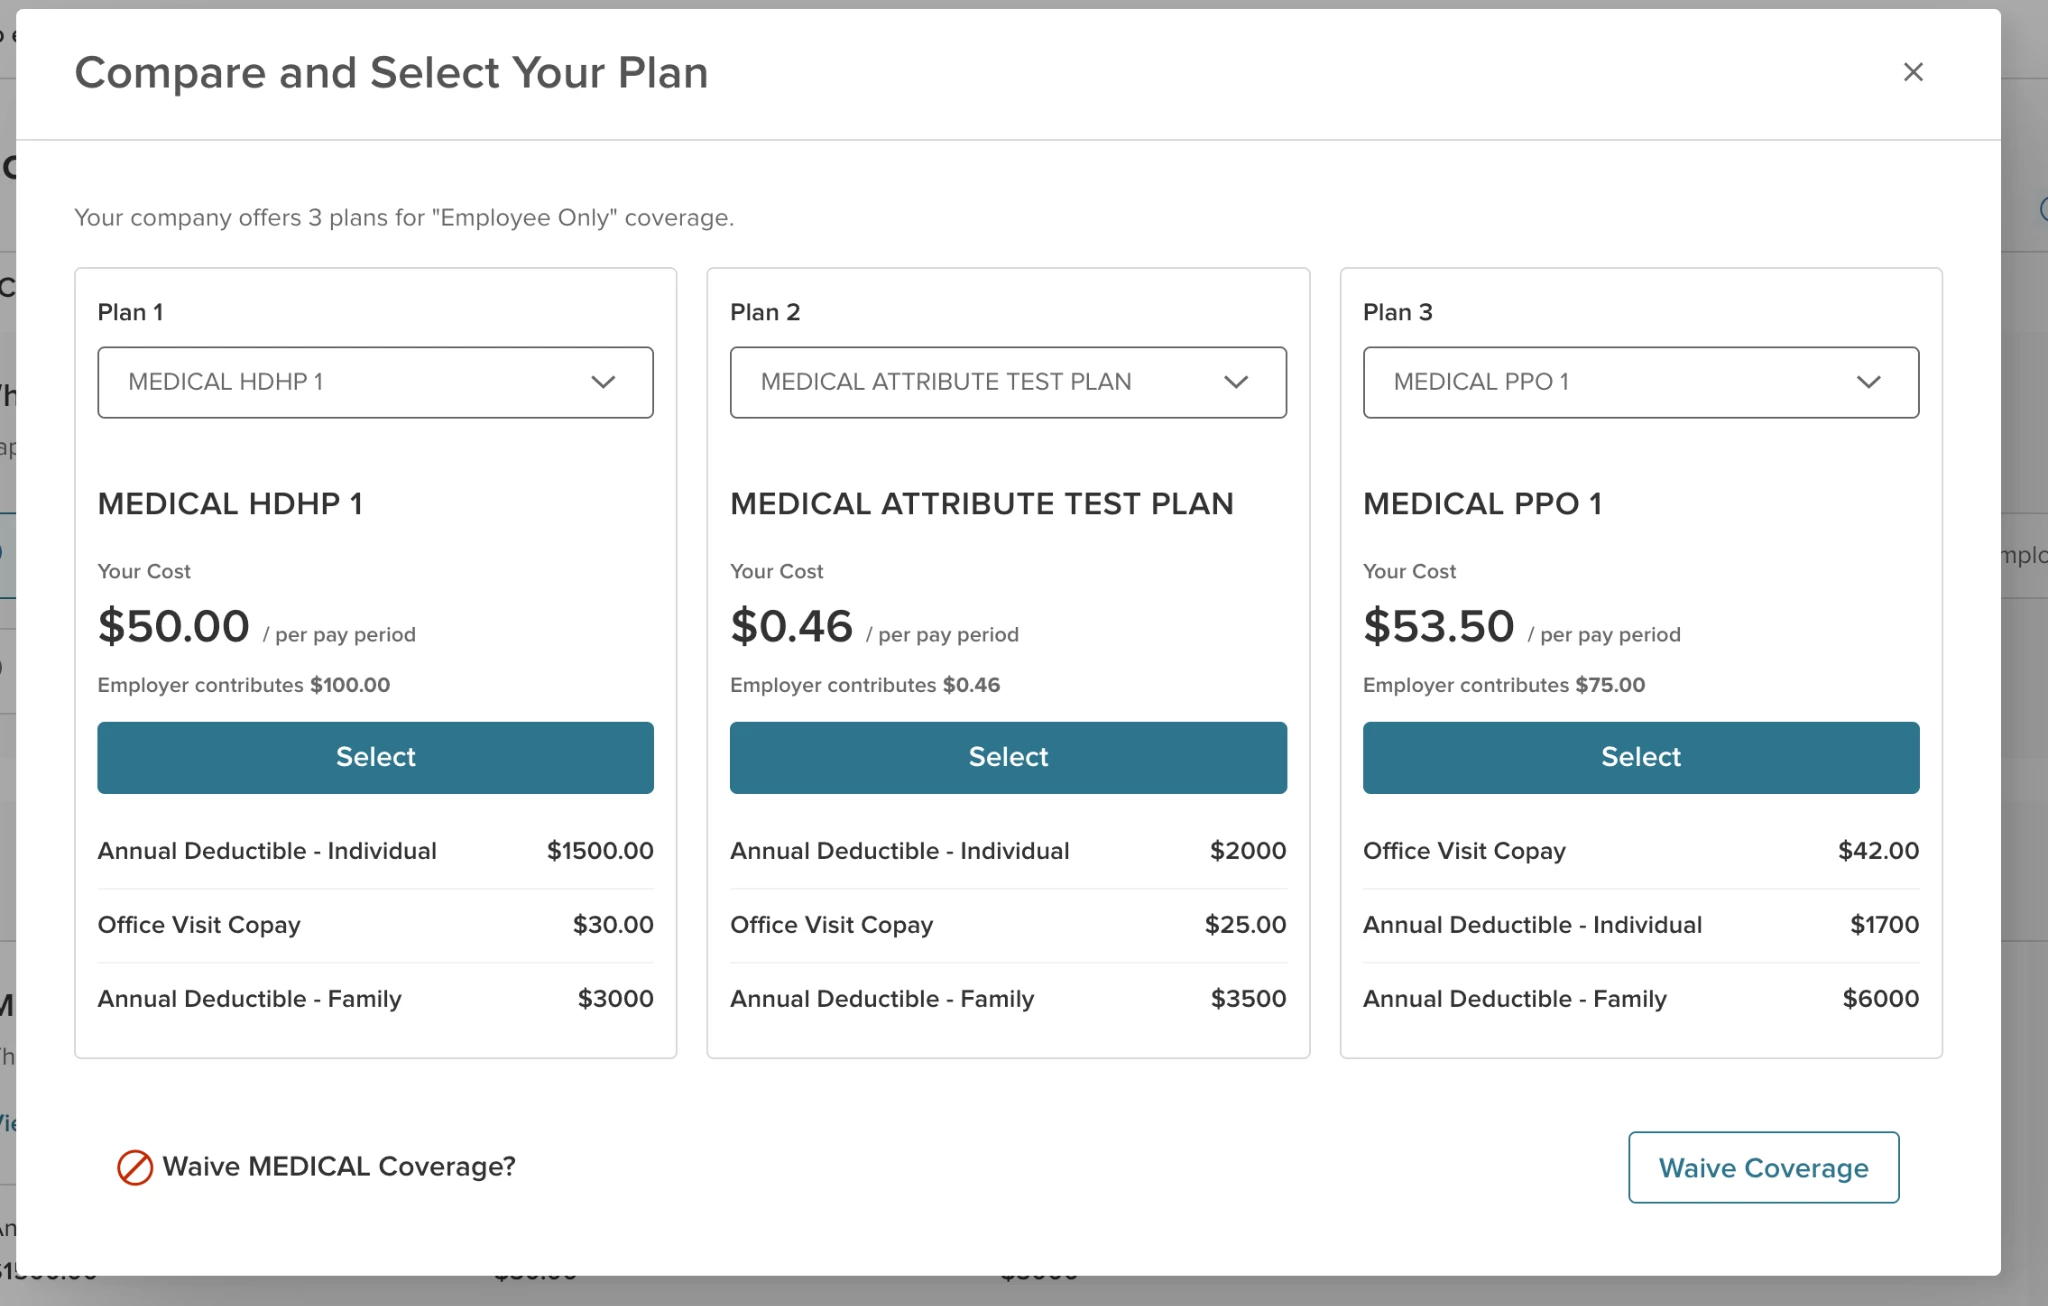
Employees can now view and compare plans directly within the enrollment process and from the Current Benefits screen, making it easier to evaluate coverage options before making elections.
Employees will see a side-by-side comparison of plan attributes (cost, coverage, frequency, and so on).
Preferred Name - Benefits
Your employees can now add a Preferred Name to their profiles. Moving forward, this chosen name will be dynamically shown across all of their benefit product screens during enrollment and review. The preferred name will show in the following places if applicable.
- New open enrollment workflow.
- When viewing employee lists in open enrollment and life events.
- Benefit tasks.
- Employee records - Enrollment contacts.
- Administrators editing employee elections.
- Audit logs.
AI Writing Assistant - Open Enrollment Messages
The AI writing assistant is designed to help you effortlessly create clear, engaging, and professional communications for your employees during open enrollment. Our built-in AI tool transforms your rough drafts into polished, impactful text in seconds.
Enabling the AI Writing Assistant
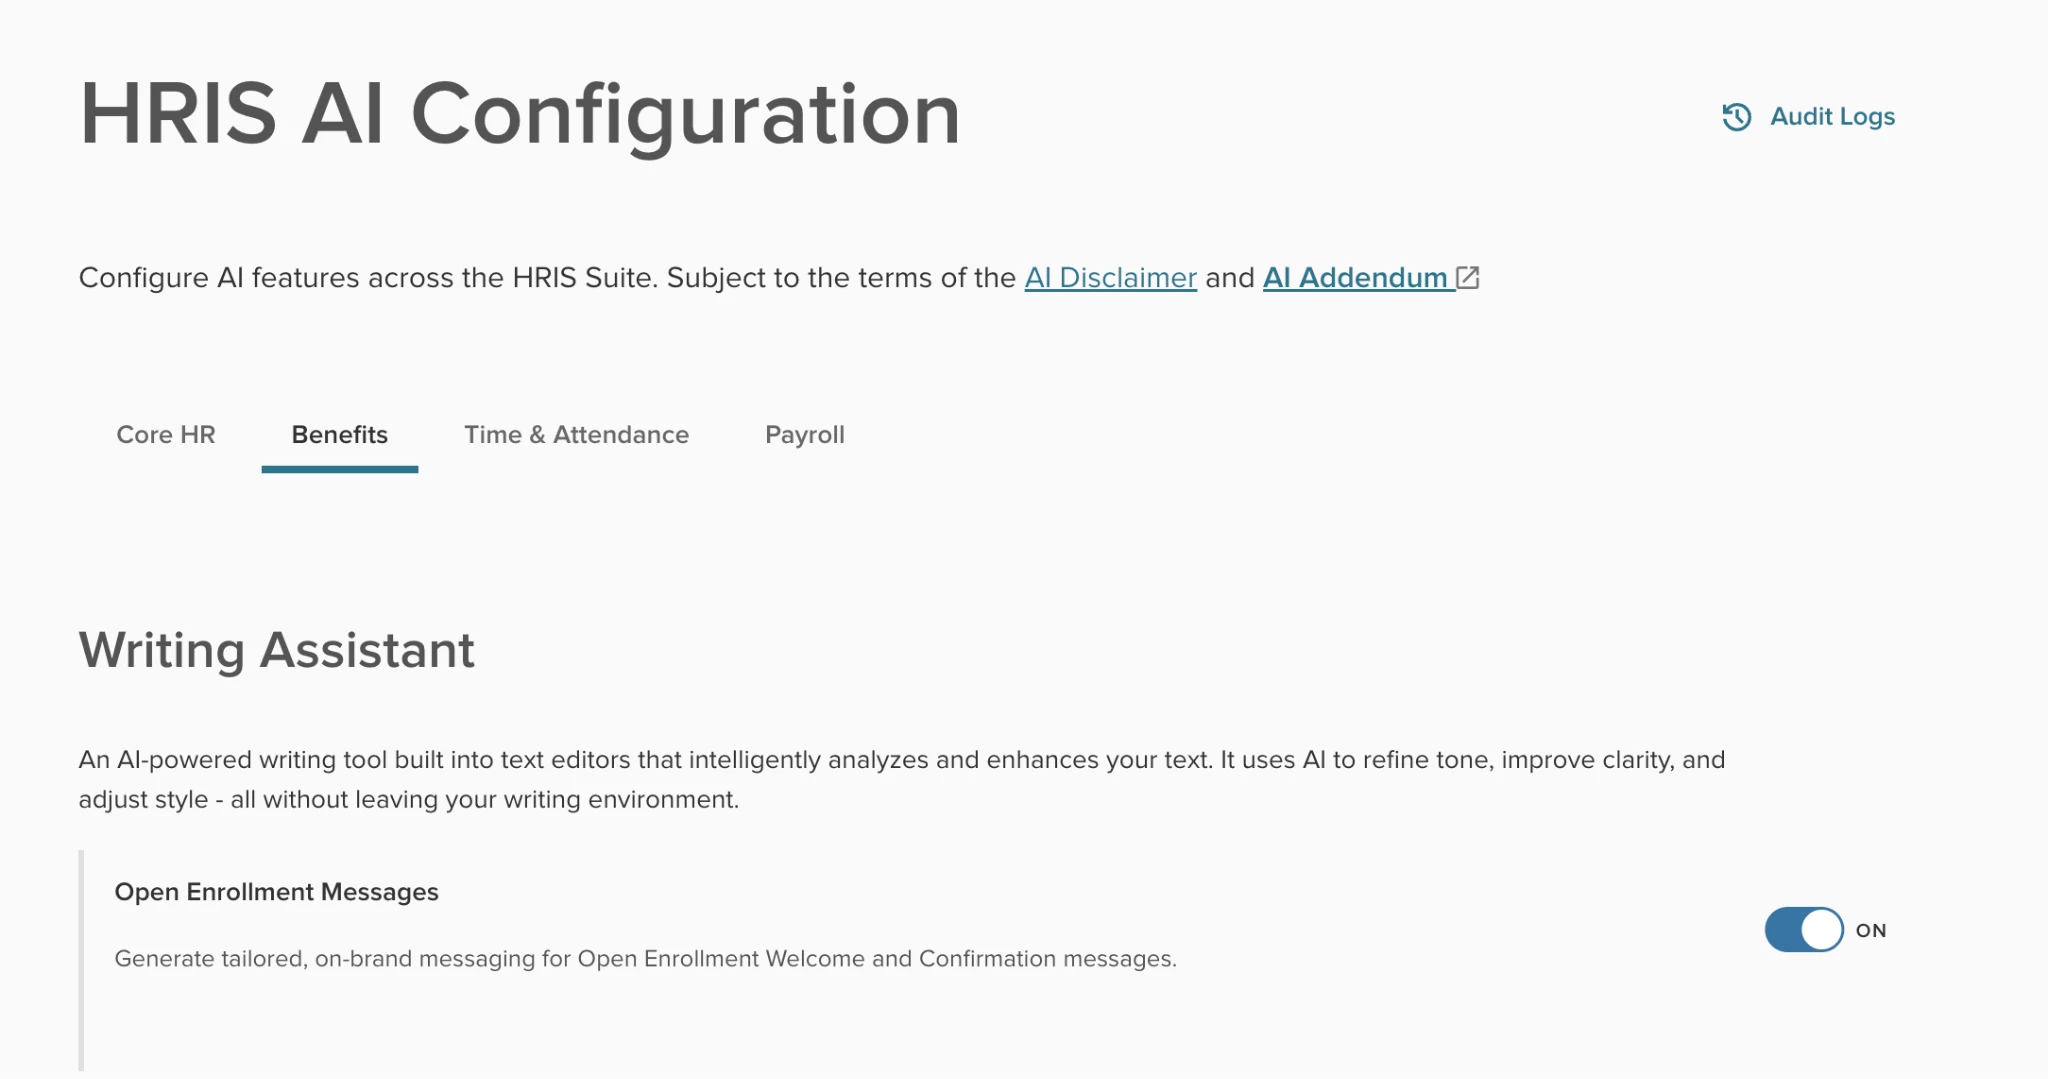
Before you can use the AI tool within your open enrollment workflows, it must be enabled at the system level.
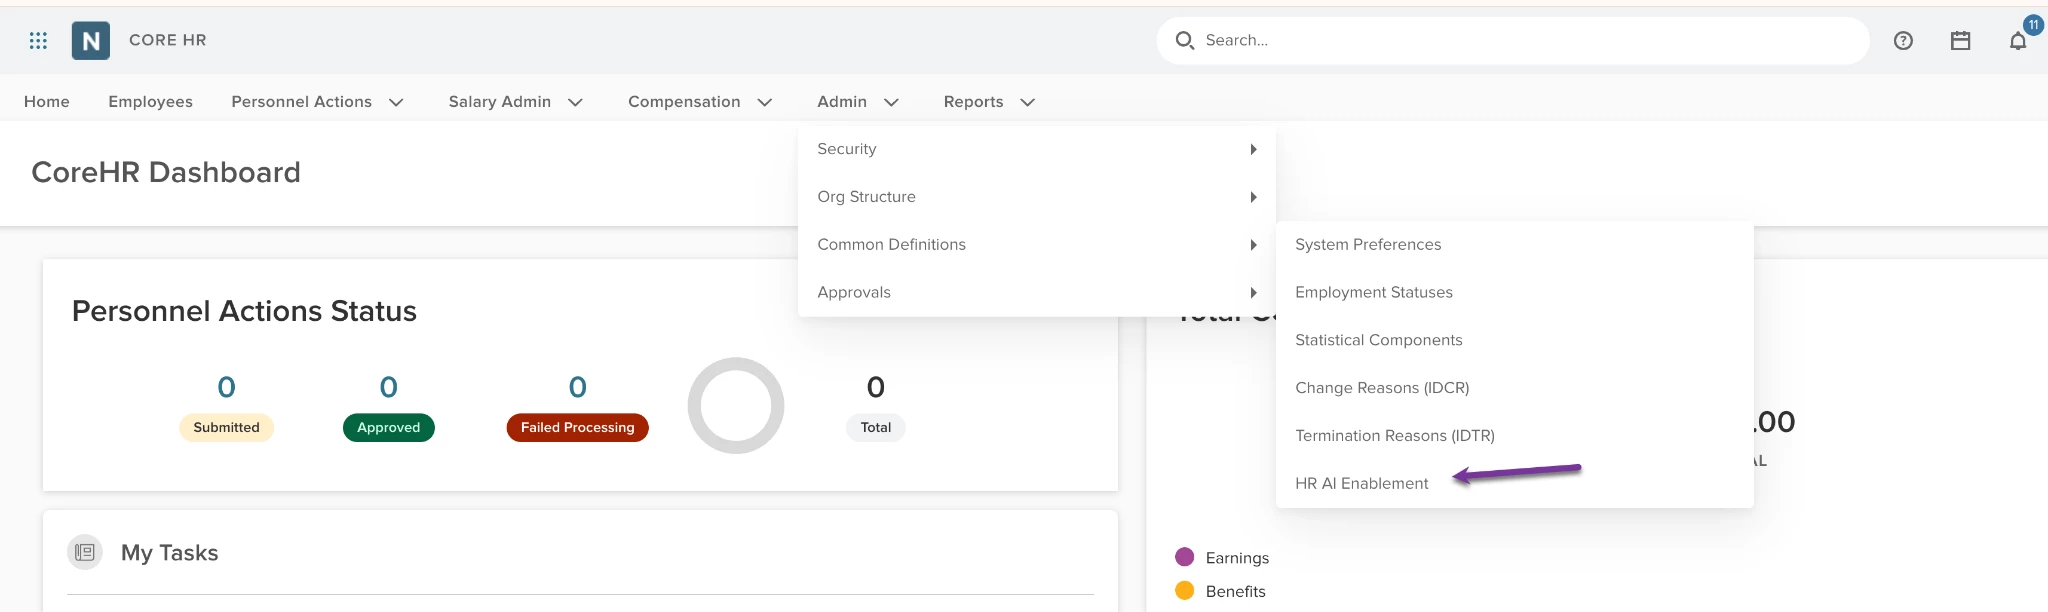
- Navigate to Core HR in the top navigation bar.
- Select Admin > Common Definitions.
- Select HR AI Enablement from the dropdown menu to toggle the feature on.
Crafting Messages
Once enabled, the AI writing assistant will be available inside the rich text editors when configuring your open enrollment events.
Step 1: Access the Text Editor
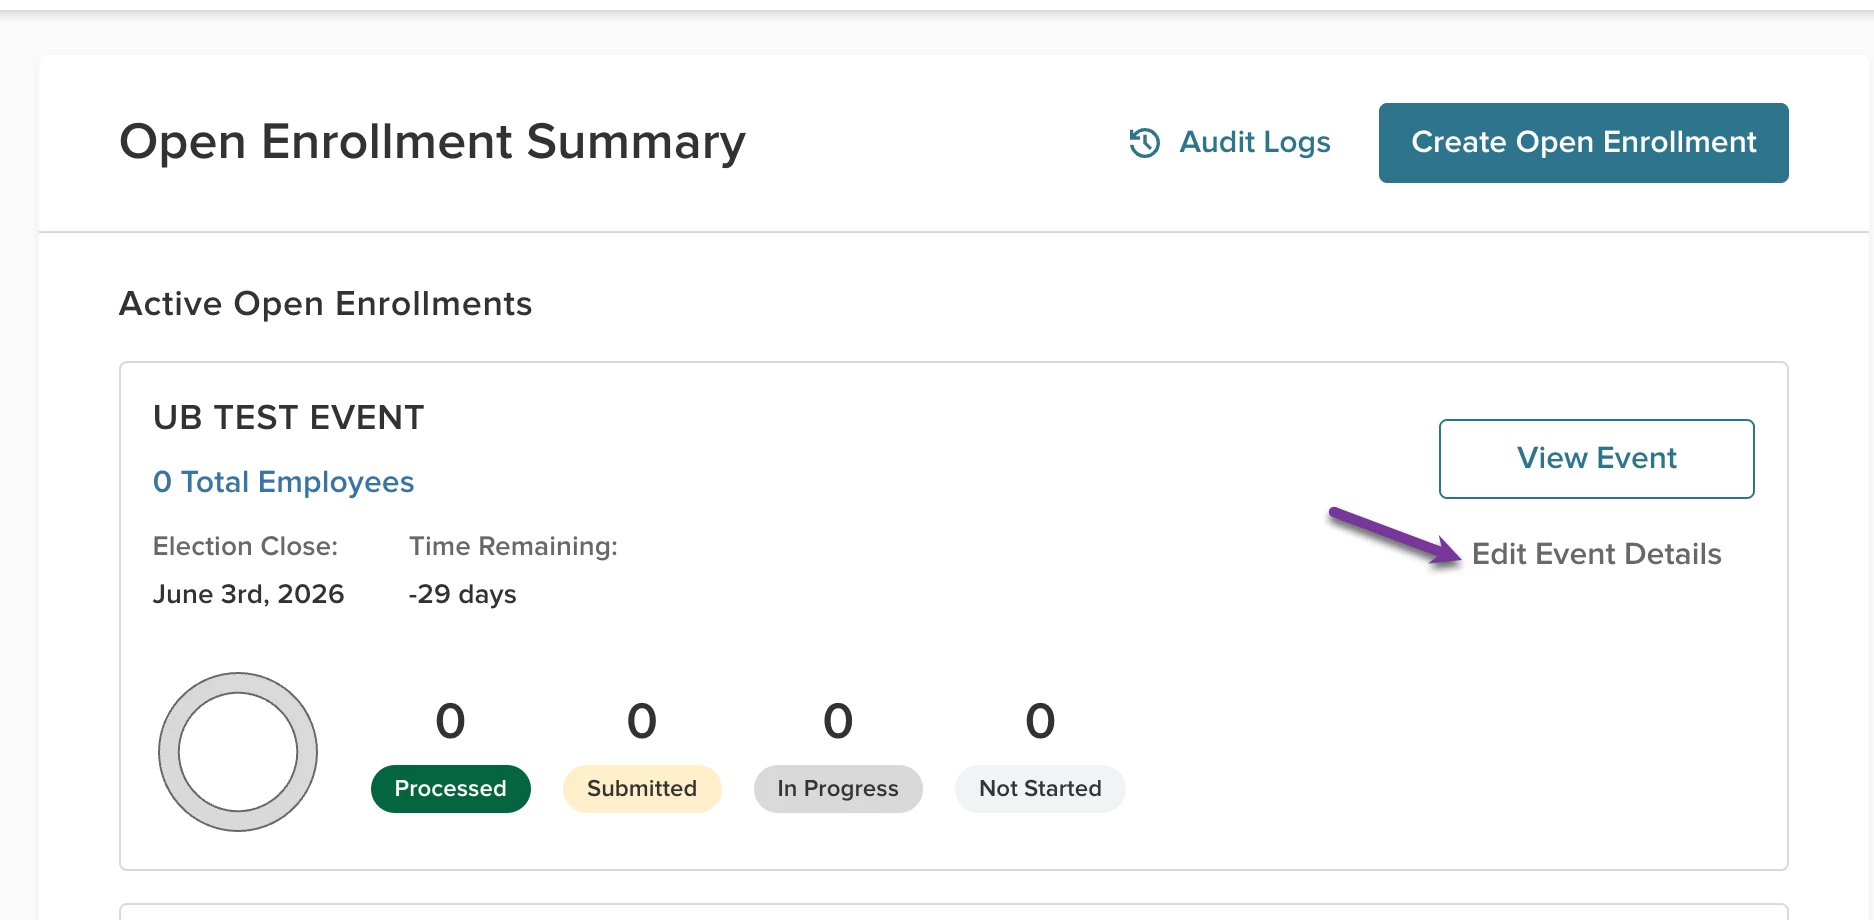
- Go to your Open Enrollment Summary page, select your event, and select Edit Event Details.
- Navigate to the Description tab where your Welcome and Confirmation messages live.
Step 2: Input Your Rough Draft
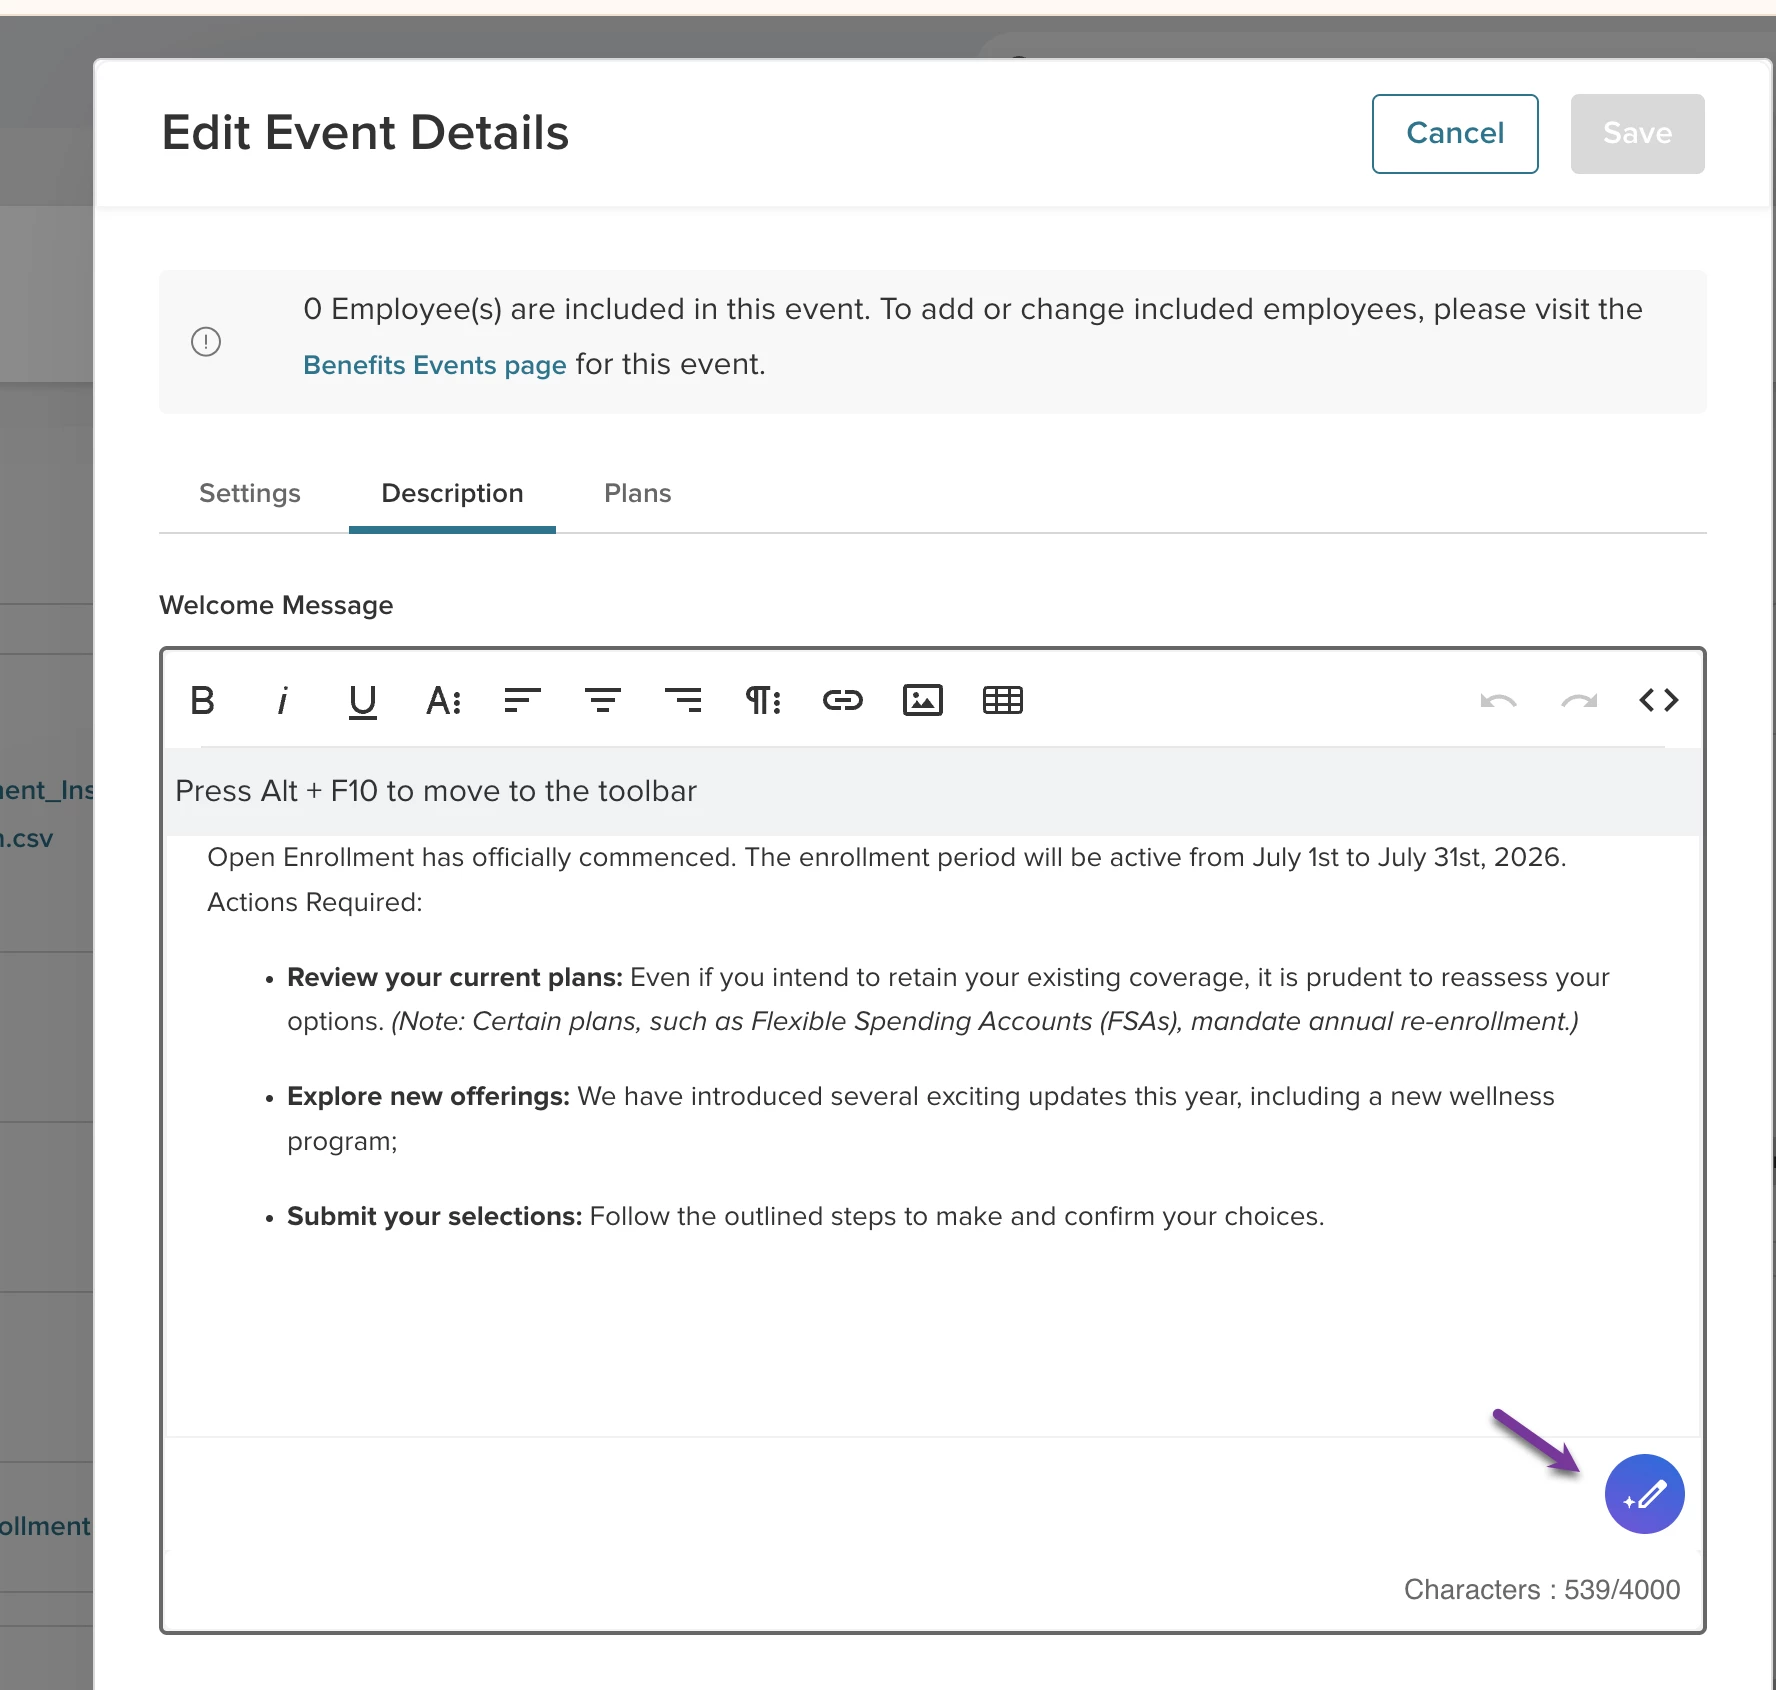
Note: The AI assistant functions as a refinement tool. You must have text already typed or pasted into the text editor for the AI to analyze and improve.
Step 3: Launch the Assistant
Select the purple AI Writing Assistant icon (the circle with the sparkle pencil) located in the bottom-right corner of the text editor box.
- First-Time Use: The first time you select the icon, an AI disclaimer popup will appear. Review and accept the disclaimer to proceed.
Step 4: Choose Your Refinement Option
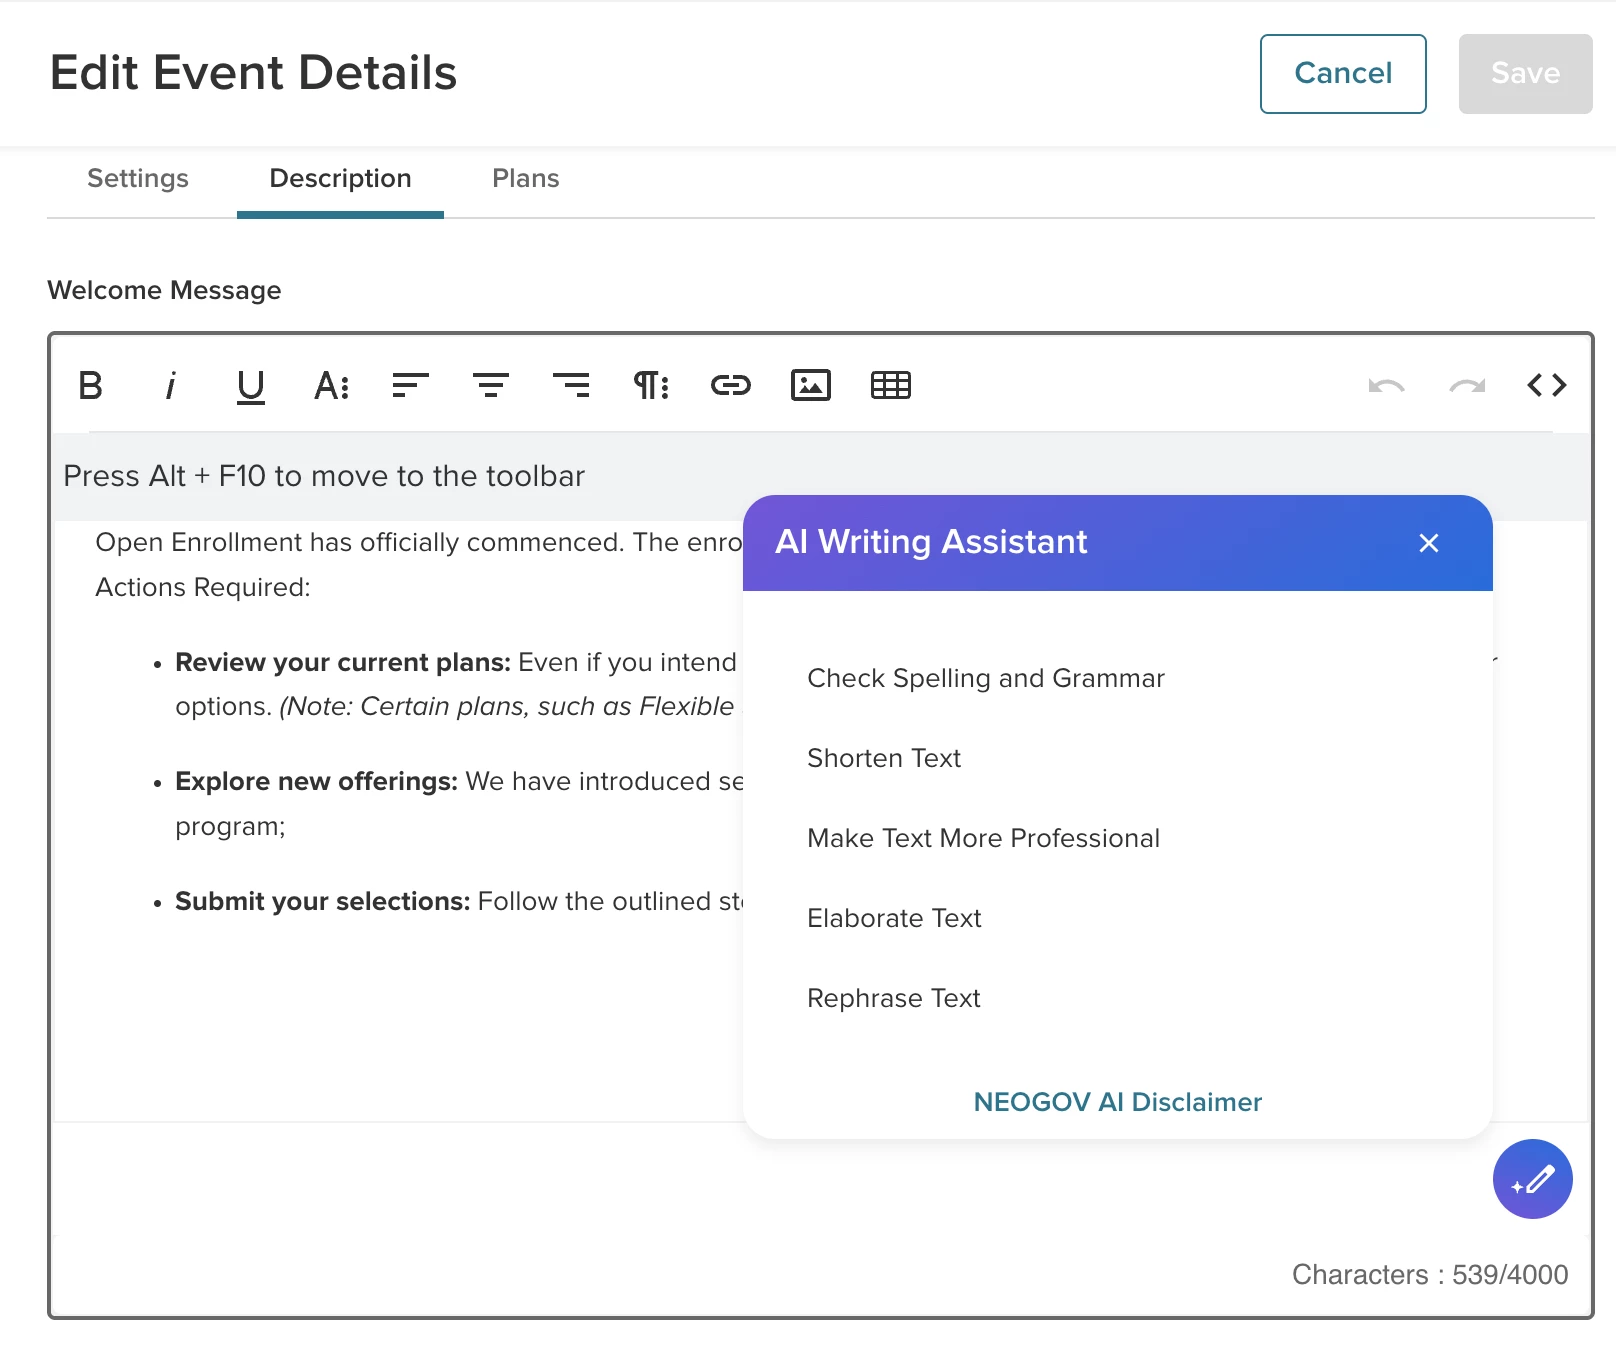
A menu will appear offering five targeted ways to optimize your text. Select the option that fits your goal.
- Check Spelling and Grammar: Quickly clean up typos and structural errors.
- Shorten Text: Trim the fluff for a more direct, concise message.
- Make Text More Professional: Elevate the language to match a formal corporate tone.
- Elaborate Text: Expand on your points to add more detail and context.
- Rephrase Text: Restructure sentences for better flow and readability.
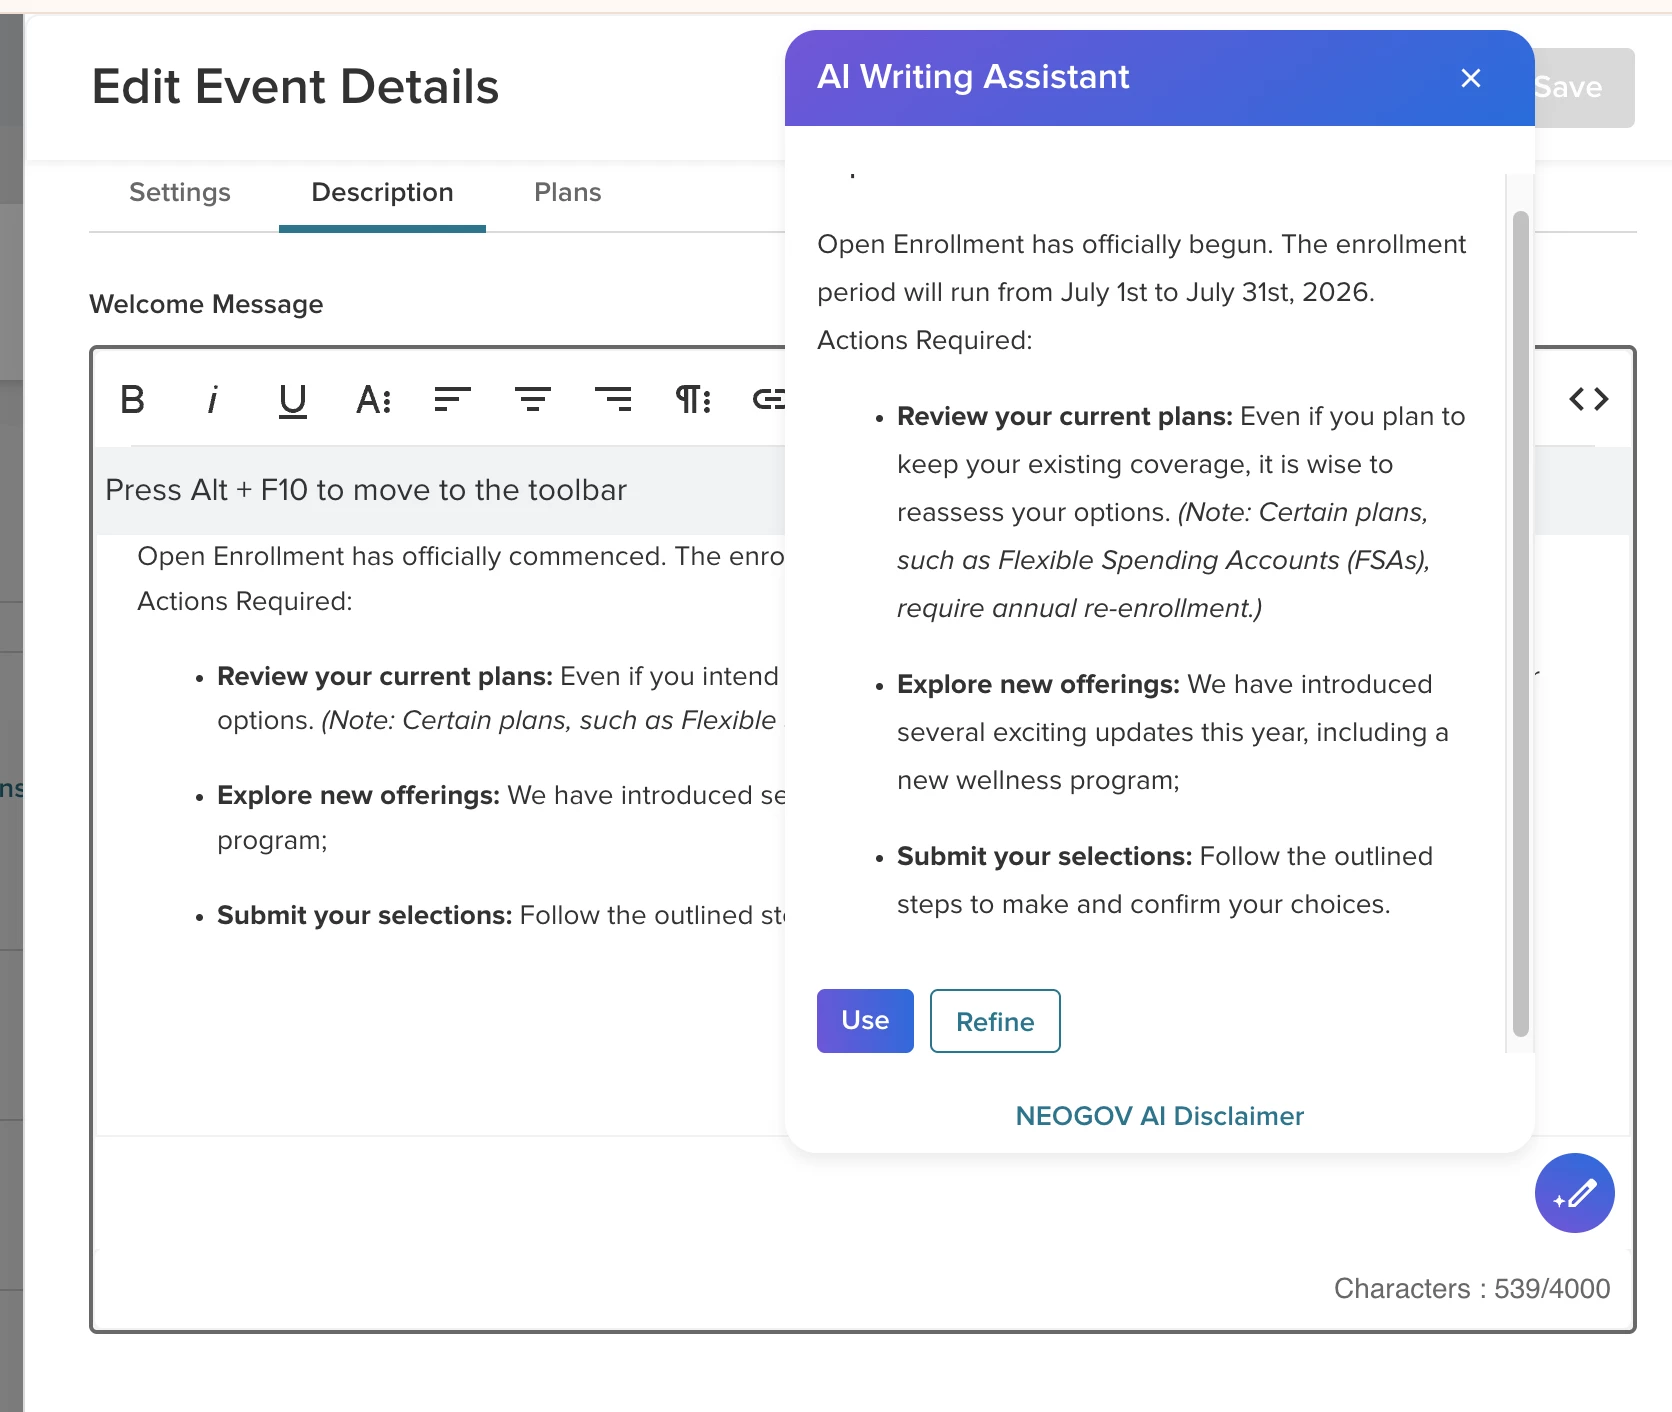
Step 5: Review and Apply
The AI will generate a preview of your optimized text. From here, you have two choices.
- Use: This will instantly replace your original draft with the new AI-generated version in the text editor.
- Refine: If it's not quite right, select this to apply additional adjustments until it is perfect.
Appendix: Bugs Resolved
No additional bug fixes outside of the maintenance releases. Refer to the maintenance release notes for details.
Related Resources