

SUMMARY
This article will walk you through the process and settings to configure your Microsoft ADFS for PowerDMS Federation.
CONTENT
Getting Started with Configuring Microsoft ADFS for PowerDMS Federation
Before getting started, it'syou must have an understanding of what these products are and what you will need to be able to configure them.
-
Active Directory Federation Services (ADFS) is a Windows Server component add-on that enables federated identity management. To learn more about this product and whether your organization can benefit from such features, please refer to Microsoft's documentation here: Microsoft ADFS Overview.
-
Federate Identity Management (FIDM) is a complex subject. This topic does not intend to define terminology, protocols, or infrastructure but is a reference point for enabling your ADFS installation to work with powerdms.com. It is vital to be familiar with it before implementing a FIDM solution within your organization.
-
Federated-security terminology can be redundant and particular to a specific protocol, so we'll make the following assumptions:
-
Relying on Party or Resource Partner Organization: powerdms.com
-
Relying on Party STS or Resource Federation Server (RP -STS): accounts.powerdms.com
-
Account Federation Organization: [Your Company]
-
Identity Provider or Account Federation Server (IdP): ADFS
-
Prerequisites to Connect PowerDMS to Your IdP
You must prepare your server environment for federation with the following information.
-
Public-facing domain: for example, <yourdomain>.com.
-
A public-facing domain that resolves to your IdP server (ADFS): for example, identity.<yourdomain>.com.
-
Valid SSL Certificate for the IdP hostname.
-
Port 443 (SSL) has been made available for your IdP server and is accessible online.
Installing ADFS
ADFS can be configured for multiple roles and highly depends on factors such as organization size, IT infrastructure, security concerns, and performance. You should consult the Microsoft ADFS documentation before attempting installation. This tutorial does not cover ADFS installation.
From this point forward, we'll assume you've read up on ADFS and installed it. The remaining documentation will assist you in configuring your installation and adding PowerDMS as a trusted relying party.
IIS Configuration
-
Open the Internet Information Services application on the public-facing server. Depending on your ADFS installation type, this will be on your ADFS Proxy Server or ADFS Server.
-
You must configure the ADFS Web Site in IIS Manager for SSL by creating an HTTPS binding using the IdP certificate. This is located under the Edit Site Binding window.
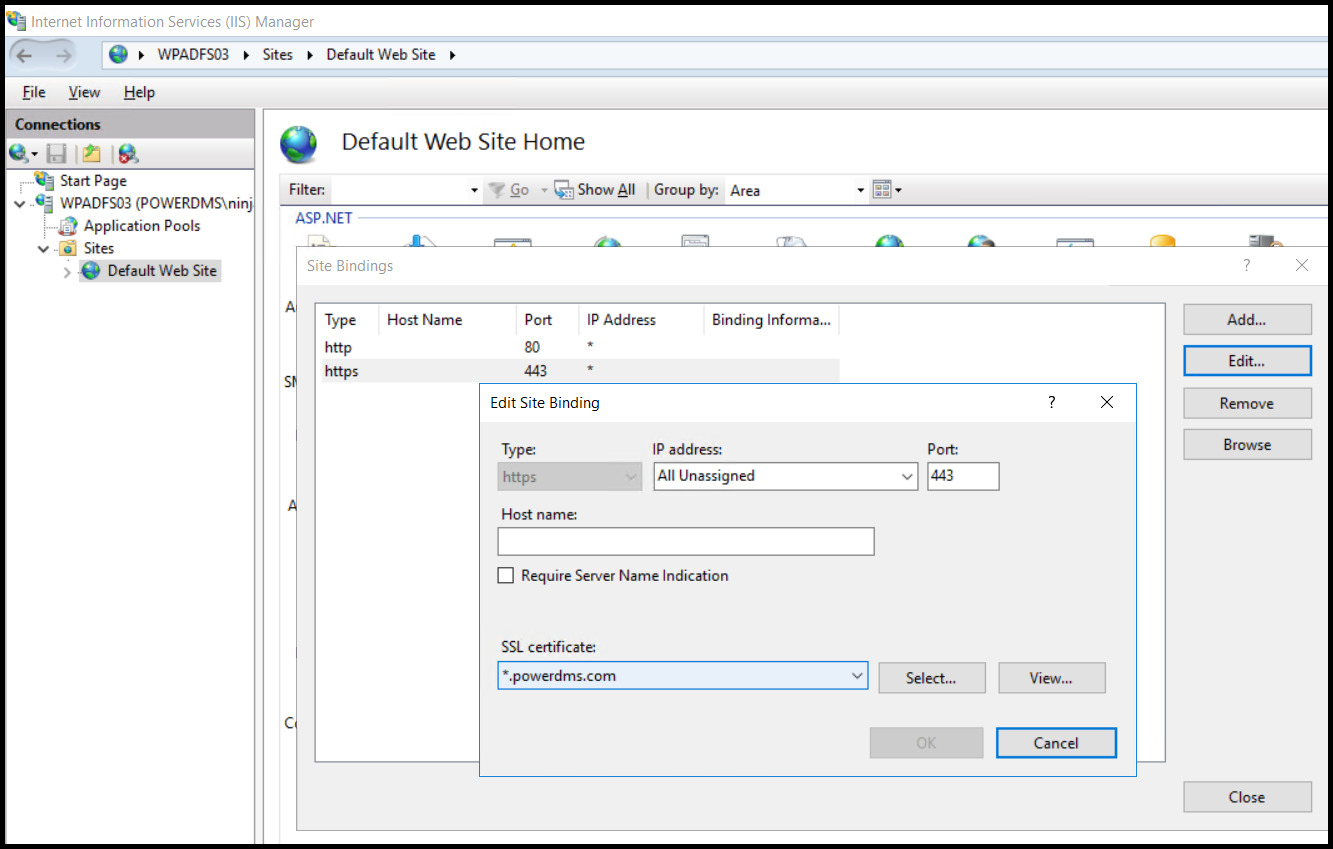
| Note: You must give your IIS Application Pool user account Read access to your certificate's private key. This is covered in the Microsoft ADFS documentation. If you use the default app pool identity, the username is "IIS AppPool\DefaultWebSite" on the local machine. You can give the account Read access through the certificate's mmc snap-in. |
ADFS Configuration
-
Open the ADFS Management application on the ADFS server.
| Note: If you have previously configured ADFS, do not remove the previously installed relaying party trust. Doing so may prevent mobile users on older mobile app versions from authenticating (if they still need to update to the newer version). We recommend all mobile users update to the latest version available through their respective app stores before implementing these changes. |
-
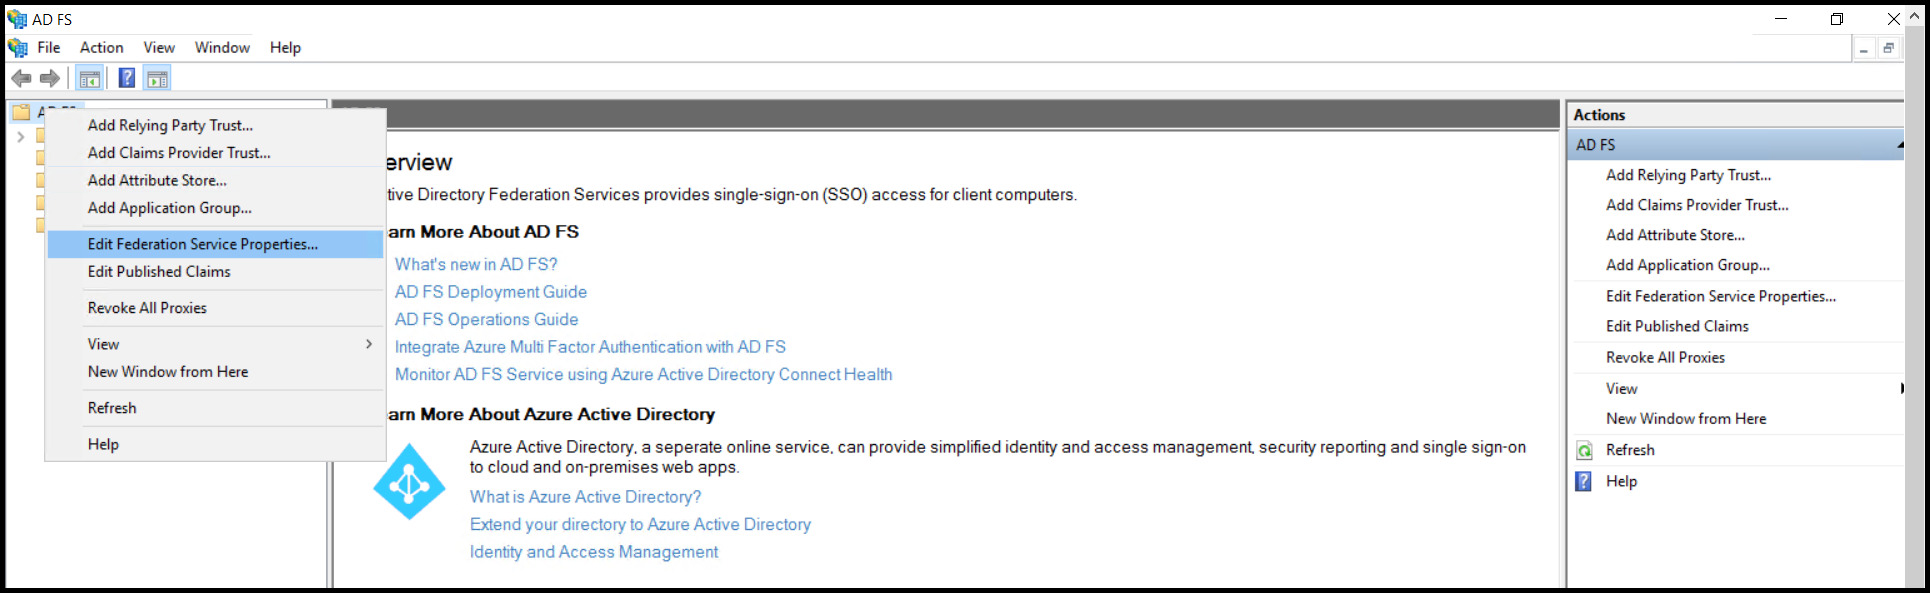
Right-click ADFS and select Edit Federation Service Properties.
-
Use the image below to guide your configuration but enter your organization's information.

-
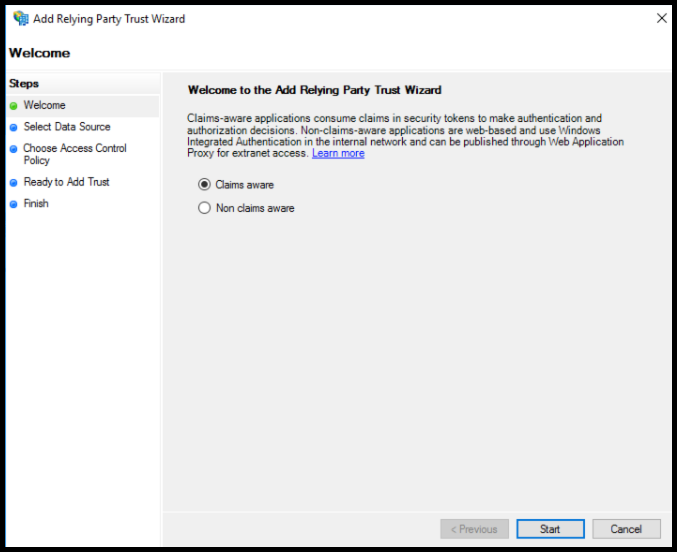
Click Add Relying on Party Trust.
-
Click Start.
-
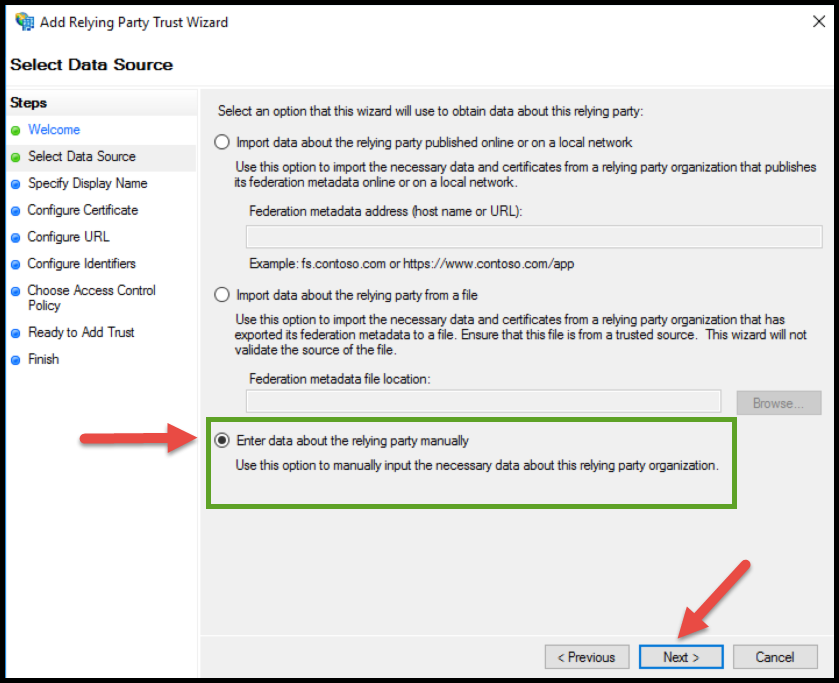
Select Enter data about the relying party manually, then click Next.
-
Enter a value on the Specify Display Name screen (e.g., "accounts.powerdms.com") and click Next.
-
Leave the default selection (ADFS) and click Next.
-
Leave the default as No Encryption Certificate for Configure Certificate and click Next.
-
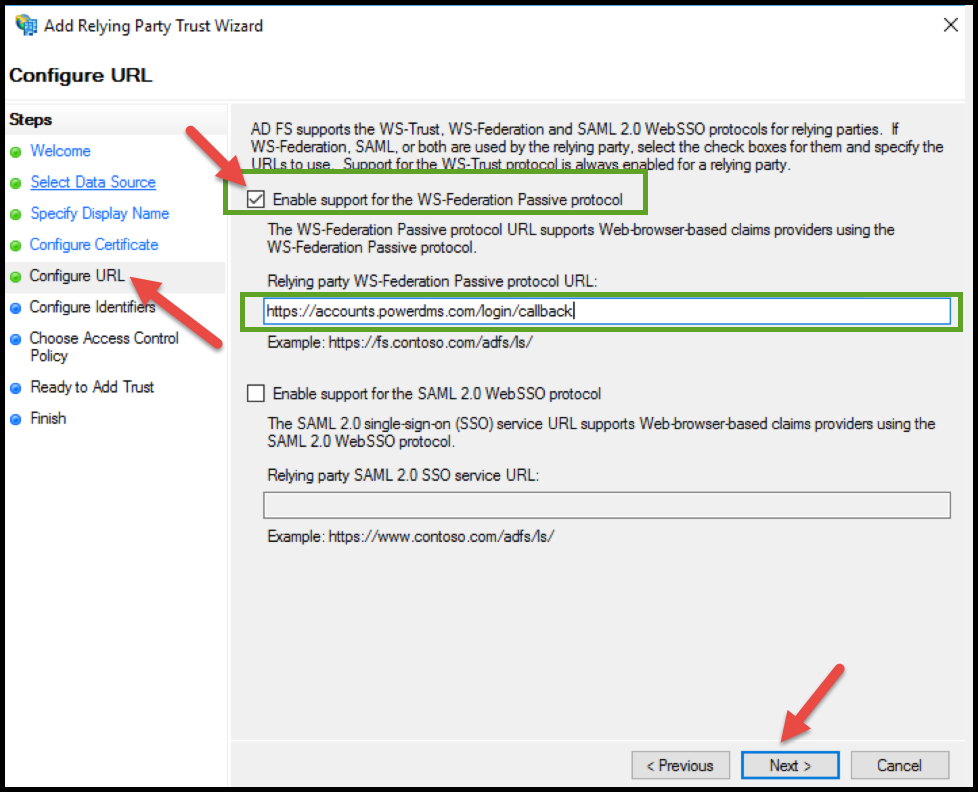
On the Configure URL screen, check to Enable support for the WS-Federation Passive Protocol, then enter https://accounts.powerdms.com/login/callback/b> in the Relying party WS-Federation Passive protocol URL text box. Click Next.
-
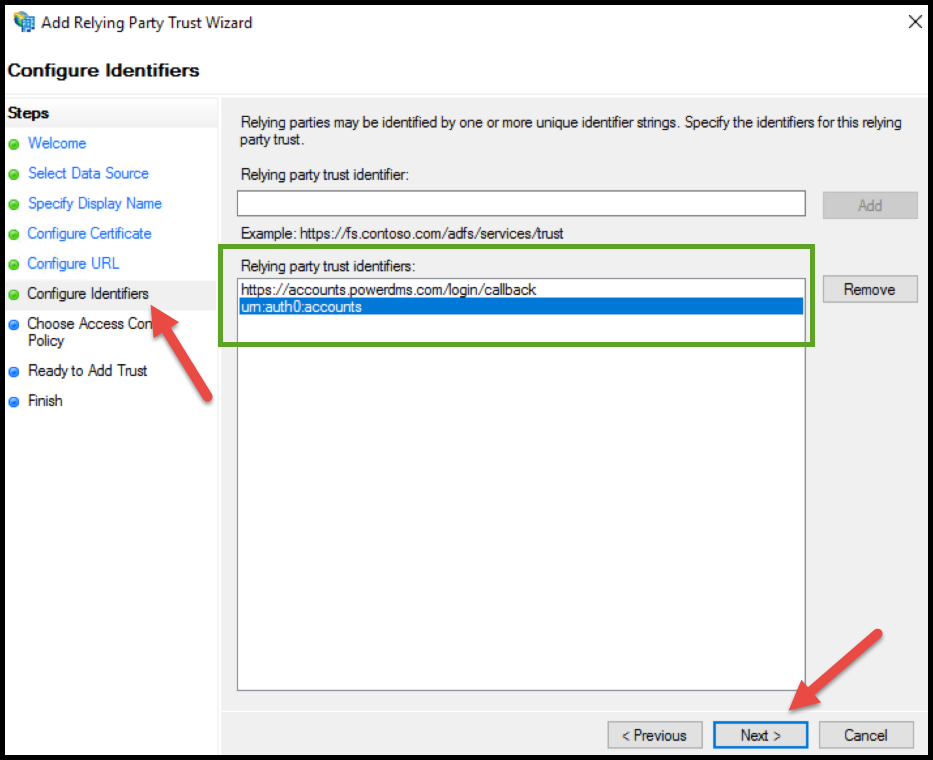
Under the Configure Identifiers screen, add a Relying party trust identifier as urn:auth0:accounts, click Add, then click Next.
-
Under the Choose Access Control Policy page, leave the default option, Permit all users, then click Next.
-
On the Read to Add Trust page, click Next, then Close.
-
The UI will show a new window to edit the Claim Rules. Click Add Rule.
-
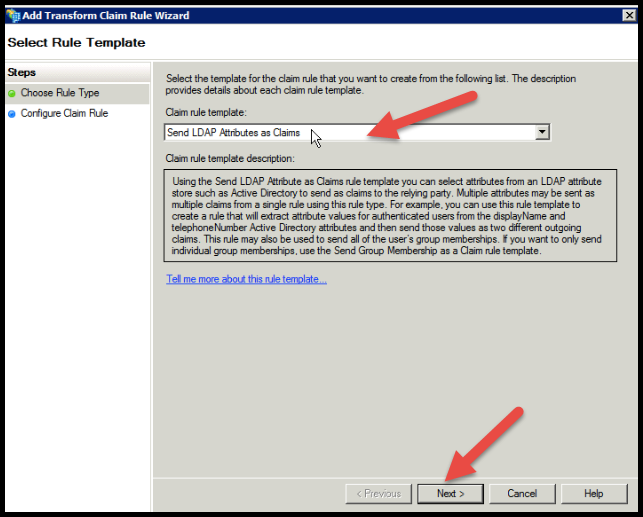
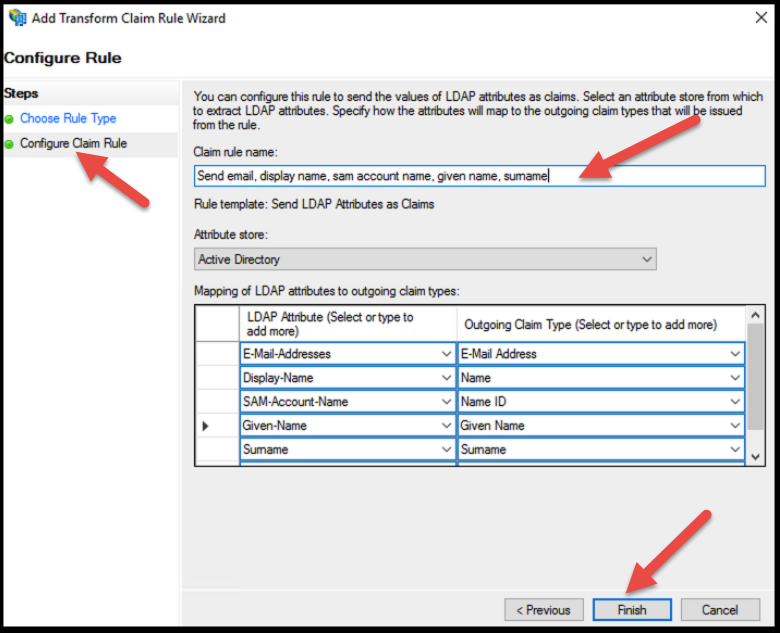
Under the Choose Rule Type page, leave the default option, Send LDAP Attributes as Claims, and click Next.
-
Under the Configure Claim Rule page, give the rule an arbitrary name that describes what it does. For example: "Map ActiveDirectory attributes."
-
Select the mappings as shown in the image below, then click Finish.
| Note: MIGRATION CHANGE |
Bypassing a Single Sign On Lock-Out
If you ever get locked out of your Single Sign On (SSO) site, you can bypass your SSO login page using the following link: https://powerdms.com/ui/login.aspx?formsauth=true. After using the link, enter your sign-in credentials (username and password) into the appropriate fields on the page that appears, and your PowerDMS site will open.
Entering Your Federation Metadata into PowerDMS
-
Log into PowerDMS as a Master Administrator.
-
Navigate to the Administration Menu by clicking the drop-down menu under your name in the upper right corner of your screen.

-
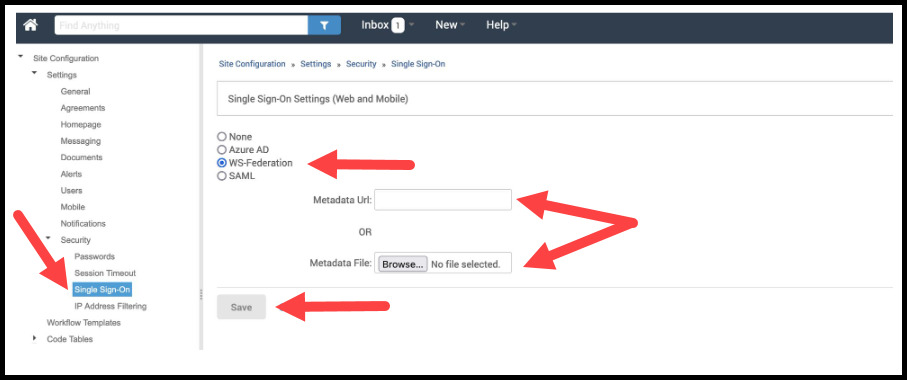
From the open window, navigate to Select Settings>Security>Single Sign On.
-
Click the WS-Federation radio button.
-
Paste in your Federation Metadata URL or select Browse to upload a copy of your federation metadata XML file.
- When you are done, click Save.
RELATED ARTICLES